Nichehacks grew as a reputable resource on affiliate marketing and online entrepreneurship, and as part of that growth, we wanted to keep developing tools to help our community thrive. So, after asking questions, conducting research, and loads of experimenting, we zeroed in on some key features and functionality that we believe will help propel our community forward.
If you consider the ever-changing nature of online business, creating relevant, up-to-date, and usable content is quite a challenge. As most have experienced, outdated information could be costly and leave you frustrated and running in circles. Wouldn’t it be great if you could access content that’s relevant to your niche, easy to find, with a little bit of accountability feedback? Well, now you can!
Our primary goal is to give you the tools to find, interact with, refine, and publish quality content. With the new release of Nichehacks, we believe we’ve accomplished that goal.
Customize your feed.
Let’s begin with the homepage article feed. As always, you’ll have access to all of the published content as in the previous version. However, by creating your free account, you can customize your feed by following the authors and topics that interest you most. Then, each time a new article is published on your selected topic or by your favored author, you will see it added to your feed. No more wasting time scrolling through titles to find what you’re looking for! You can change and fine-tune those settings anytime.
Another significant addition to the site is the long-awaited search bar! No more wasting time scrolling through gazillion pages. Now you can be as granular in your search as you want to be.
A must-have tool for your content game
According to Growthbadger, over 2.5 billion blog posts are published each year. That’s 6,912,000 blog posts per day! How in the world are you to compete with such overwhelming competition? While there’s isn’t one perfect strategy, you can apply a few proven tactics to maximize your growth potential:
The article publisher is super easy to use. All the important tools and modules are right at your fingertips so you can focus on what you do best. We’ve got the “techy” stuff covered.
Our task was to create a simple yet powerful interface that will provide all the essential tools for an author to succeed. In addition, it needed to have the technical engine to ensure your content is indexed well, intuitive to navigate and become a natural part of your workflow.
The team worked hard to ensure that the interface is very intuitive to use and does not require any technical know-how. If you produce great content, you shouldn’t have to be an SEO expert or a WordPress guru. We’ve also designed a dynamic checklist that accompanies each section, so you won’t have to worry about missing anything important.
Also, in order to maintain the quality of content, each submitted article is vetted by our team to make sure it complies with our community standards. You’ll always have a chance to re-submit the corrected article.
One of the core growth vehicles of a community is communication and interaction. So no matter how great your content is, it can be even more remarkable when it’s refined in the context of peer review.
Each article can be upvoted or downvoted, depending on the quality of its contents. Every member can challenge, encourage, question, and engage with each article in the comments section. It will refine the quality and relevancy of the article’s content and allow you to engage and create a loyal following.
Also, by becoming a Nichehacks contributor, you’ll get an invitation to join an exclusive Slack channel. There you can ask questions, engage with our team or other authors in the community, share your feedback, or collaborate. It’s a great way to extend your network and leverage the power of the community.
Final thoughts
We have big plans, and you’re invited to grow with us! We hope that Nichehacks becomes a vital part of your growth as an online entrepreneur and can provide the support you need to succeed. As always, we welcome your feedback, comments, and suggestions. So go ahead and publish away!
Nichehacks Team
Frequently Asked Questions
Can anyone become an author on Nichehacks?
YES! If you have expertise in e-commerce, business, marketing, affiliate marketing, blogging, or any other topic in the area of online entrepreneurship, you are eligible to be an author at Nichehacks
What makes Nichehacks different from other publishing platforms?
There are many great online blogs and publishing platforms out there. However, they are also very crowded. We’re fairly new, but hungry. There’s a unique opportunity to grow with our platform, earn a loyal following and carve out a space in your field of expertise. Our tools are intuitive and easy to use. Our content is vetted for quality and relevance.
What if I don’t see a topic relating to my field of expertise. What do I do?
You can always reach out to us via email or contact form. If the topic aligns with our vision, we’ll add it to the roster.
How do I grow on Nichehacks?
Easy. Be active! Follow other authors. Comment on their posts. Give valuable feedback. Share your articles on social media. Promote it on your email list.
Google Ads, formerly known as Google Adwords, is Google’s advertising platform, where promoters and marketers bid on specific keywords that allow their clickable ads to emerge in the search results of Google’s search engine.
Google Adwords help you share and generate timely ads for your potential clients to see. Your website will appear on the search results page at the right time to grab the attention of potential consumers who are searching for relevant goods and services like yours.
Google Adwords will certainly get you more customers for your brand. But to run these ads, you need to pay Google for these clicks. This is how Google has been earning money for the past several years!
Google Ads is the next phase in your marketing efforts after you’ve perfected your website and implemented SEO basics. Now, all you need to do is attract your targeted audience.
We’ll help you understand Google Adwords, its benefits, and how you can create an effective ad campaign for your website. This step-by-step guide will help you optimize your brand ads and accomplish outstanding results.
Advantages of Google Ads for your Business
Google Ads is no doubt an efficient strategy for growing your small business and generating potential clients while they’re searching for particular services or products like the one you provide. These well-timed ads can significantly help boost traffic, orders, and profitability.
You might be wondering why you should advertise on Google when there are other platforms too. That’s because Google offers you $10 on every $1 of your investment.
Google has been around for 20 years and receives 4 billion searches per day. One of the biggest benefits of Google Ads is that it works much faster than SEO. Rather than waiting to get more views on your website, an Ads campaign will immediately drive traffic.
Additionally, you can even enhance your brand awareness and generate new leads. It also offers you the opportunity to get ahead from your rival brands and promote your brand in the right way.
Plus, by using Gmail Ads through Google Ads, you can effortlessly make your brand accessible to your audience, right in their inbox.
Establish your budget, provide billing information, assess your campaign, and then submit. One of the points to keep in mind is that your budget should always start small. An easy budget will help you get conversions and traffic on your site without being heavy on your pocket.
Choose the targeted audience and the location you want to serve. Select the network you want to concentrate on and then add relevant keywords.
Lastly, provide a brief overview of your product or service and then write the copy for your first Google Ad.
Voila! You have just created your first Google Ad.
Step # 2: Start a Campaign
Nowadays, new online ventures have numerous brand marketing options, like SEO strategies or content marketing on top platforms like Medium.
But these approaches require time and patience to reap the results. Although search optimization is a lucrative option, a large number of businesses invest in pay-per-click (PPC) campaigns.
Starting a campaign can be quite difficult and needs proper planning. The most important step before starting a PPC campaign is consumer research. Before you launch your ads, you need to understand what your customers want and how they look for it online. This will help you find the keywords or phrases related to your products or brand.
If customers aren’t searching for phrases or keywords you have targeted, then your campaign won’t be effective. Worst, all your invested money will be wasted with zero traffic and conversions.
These Adwords campaigns are the premium buckets, followed by ad groups and driven by keywords.
Campaigns are a great way to develop brand awareness and target particular clients at specific locations. They can help you set up a type of search network where your brand ad appears. Similarly, ad groups permit marketers to concentrate on particular ad campaign variations.
Let’s suppose that your online website sells home décor items, and that your campaign will include paintings, wall pieces, candles, or crafts. You’ll set up ad groups for fine arts, interior design, abstract paintings, etc. This will help you focus on your keywords, making your campaigns effective and successful.
The right audience will help you increase your sales and profitability. Targeting potential clients is the key focus of every online brand page.
Your target audience is the group of individuals who possess particular interests and demographics that all represent potential customers for your product or service. Identifying your targeted audience will enhance the performance of your ad campaigns by getting the right viewers for your brand site.
Google also helps create an audience list that allows marketers to reach their potential audience. You will discover most of your viewers in the Audience Manager present in the shared library.
Google automatically generates a remarketing list for you that allows you to attract high quality leads effectively. Google will offer two options: either target the whole audience or target only specific viewers.
The audience segmentation available includes demographic targeting (reaching a specific age, gender, or status on the audience tab), remarketing lists (visitors who have not used your services or bought products), and interest category (showing ads to only those who are likely to make purchases).
Selecting the kind of audience segmentation depends on your goals. You can even target all the viewers and then manage the proposals for a particular audience, such as demographics vs. targeting, or eliminate only particular viewers from your chosen network.
Step # 4: Set a Campaign Budget
Sometimes budgeting can feel like a chore, but you cannot avoid it while launching your ad campaign. Since you are new to Google Adwords, it will be better to invest a small amount on your first campaign. First, you need to decide the approximate number of customers you want to gain. For example, you plan on getting 50 leads in your first week.
Now, figure out your conversion rate, cost of your keyword, and lifetime value of clients. Your campaign budget is highly dependent on these three factors. Suppose you have an ad that has a CPC of $0.25 with 250 clicks per day. Now you can easily calculate your daily budget i.e.
0.25 x 250= $62.5
For campaign budgeting, the first thing to know is the amount of traffic you need, which you can calculate through this formula:
Once you have estimated the number of leads and CPC, you can then set the budget through this formula:
Total budget = traffic required X average CPC
You even need to calculate the low and high ranges of your total budget to give you an idea. It can be calculated by using the above formula twice.
Lowest total budget = Lowest Traffic required X lowest average CPC
Highest total budget = Highest traffic required X Highest average CPC
Moreover, before finalizing your budget, you need to learn about the lifetime value (LTV) of your customers. This value basically represents your consumers’ expectations during their lifespan. This amount will help you understand how much you can get in the future through this customer. LTV can be estimated through this principle:
LTV = Annual profit of customer X number of years the client remains with you
Setting a campaign budget is actually estimating the value of your customers.
Step # 5: Select the Bidding Strategy
Google Ads campaign offers various bidding approaches, each tactic defined for a different campaign. The bidding strategy highly depends on your targeted campaigns’ network, whether you want to concentrate on impressions, getting clicks, or increasing website views or conversions. Marketers themselves decide what approach is best for their site.
But before that, it is necessary for you to know what the acquisition cost is; not having enough knowledge can make the process difficult. CPA (Cost per Acquisition) is basically the amount of money a site owner can afford in order to spend on one purchaser client.
Let’s say that the price of one of your products is $80, and you are setting your target to $80. This would result in breaking even, though your goal is to gain profit. So, decide your target CPA first then enter it.
Consider the network of your targeted campaign in optimizing conversions. If your key focus is to drive conversions on your site through an ads campaign, you must select the target CPA bidding approach, focusing on converting the users at a specific acquisition cost.
Through this strategy, Google Adwords will spontaneously establish your bids on every campaign on the basis of your CPA.
You might spend a minor amount on some conversions, while some of them can be quite expensive. This will help you get aligned with your acquisition budget.
Want to become the smartest marketer in your niche? Choose the best bid strategy for your brand site and see your website among the top results. Google will offer you five smart bidding approaches: Target cost per action (CPA), maximizing conversions, ROAS (Target return on ad spend), ECPA (Enhanced cost per click), and Maximize Conversion Value.
Step # 6: Set Ad Extensions
Your unfamiliar product site needs traffic and conversions. You’ve introduced your first ad; now, you can enhance it through the right extensions. Google Ad extensions are basically the additional information about your product that you couldn’t add to your campaign.
There are various types of ad extensions, and each one of them provides diverse benefits and information that results in optimizing and enhancing the performance of your ad campaigns.
You can easily create these ad extensions while creating your Google Adwords or distinctly through the Ads Manager, depending on your choice. It will only take a few minutes to set up, as the templates are already available. All you need to do is fill it out.
You can create ad extensions through the Google console. Go to the Ads and Extensions, and then click on the Extension button.
A list of extensions will be presented to you to choose from. Select the create button, and add the description. You will have to provide different descriptions for each extension type.
Once the extension is set up, now you can add it to your ad campaigns. During the Adword creation process, there will be an option “Ad Extensions” at the bottom.
Step # 7: Keyword Research Choosing Right Keywords
Marketing your service or products through Google Adwords will help your website gain the right traffic and increase sales. Just as you made efforts to curate effective content through effective keywords, your Adwords campaign needs to have the right keywords, too.
It is especially important that the keywords you have added in your campaign are the most searched ones. By combining a list of analogous keywords, you can easily set yourself up for related Ads helping you get more views.
It is advised that you only use a maximum of 15 keywords for your ad campaign to perform effectively. You can even make use of Google Adwords keywords Planner to help you search for the right keywords for your business. Moreover, the Planner also offers numerous options for validating your own researched keywords by presenting the CPC, completive data, and their search volume for each keyword.
Google keyword planner provides insights on how often the specific keywords have been searched and how these searches have changed with time. This allows marketers to narrow down their search lists.
After listing the right keywords, the next step is to get bid estimates for every keyword, which will help you in estimating the overall budget for your brand site promotion. Now, you can add these keywords to your ads campaign. Once you are ready, you can finalize and then launch your PPC campaign.
Step # 8: Create High-Quality Display Ad
Display Ads are basically the visual-based ads that most of you observe while browsing a website, watching YouTube, or using an app on a mobile phone. Responsive display ads create a win-win situation for your business.
When you create high-quality, responsive display Ads by investing more into Google Ads, the platform will make use of machine learning to optimize your ads. The prime combination of assets for each ad niche based on predictions will be built from your performance history.
High-quality display ads also help in reaching a wide area of audience. When you create logo Ads, videos, numerous headlines, and images, Google adjusts its size and appearance according to the site.
A high-quality display ad can be created by using various color schemes, videos, and images. You can experiment with different display ad types and content designs. You can even create your own routine images as well as general display ads based on your existing text ads. This will help you reap beneficial results, i.e., more impressions and clicks.
Step # 9: Billing Information
You want your ads to be on the top, running effectively, right? Then it is advised that you provide billing information to improve the efficiency of your website.
There are several ways available to pay for Google Ads, depending on your location and currency, as well as the place where your business is registered. See the options that are available before completing your account.
Once you have provided all your information for creating your first Google Ad, you will be set up billing information. You can see that there are two billing options available, i.e., manual payments and automatic payments. If you choose the manual payment option for your business, you will prepay Google Ads, and charges will be subtracted from the prepaid amount. When your prepaid balance is tapped, ads will be kept on hold until you make another payment.
Automatic payments allow you to make the payment after accumulating clicks. Google will charge you for these ads when it reaches the billing threshold or maximum a month after you made your first payment.
You can either choose to make the payments through a bank account or credit card. Just make sure that your bank account is verified through Google, which might take a while. If your website is running on the top, the best option is to link your credit card.
How to Make the Most out of Your Campaign
During these difficult times, where most businesses are struggling, affiliate marketers need to devise effective strategies for generating greater leads and drive more traffic to their sites. If you need to see immediate improvements in terms of traffic and getting more viewers, “Never Stop Optimizing.”
Leaving your ad campaigns alone will result in their slow decline. It will generate zero traffic.
Continuously optimize your Google Ads, and you will squeeze out greater performance and effective results along with minimum cost per click (CPC).
Here are some effective steps that can help you make the most out of your campaigns.
Refine and review your keywords. If the click-through rate (CTR) of a keyword is less than 1, delete it. Search for new keywords by using Google insights.
It is better to add negative keywords along with the positive ones on which you do not want to bid on. You can save money and enhance your CTR by adding Negative Exact Match and Negative Broad Match keywords to your ad groups and phrases.
Keep on testing your landing pages and your ad copy. You do not have to pay for testing new ads, so it is better to test one to three ads in addition to your best-performing ones.
Judge keywords after 200-page impressions.
Run search query reports that will help you find new keywords on which you can bid. Google Ads shows a particular searcher where your ads appear, and you can use it for further improving your campaign.
Fish when the fish are feeding. Make sure that your ad campaign is scheduled at such a time where you can get a higher customer response. Find out the time and day where the consumer’s response rate is higher. You can check this by going to the settings option where you can check the days and hours of your campaign.
Conclusion on PPC Campaigns through Google Ads
Creating and optimizing a Google Ad campaign is very much both an art and science. It would be best if you work on your ads outlook as well as constantly optimize it to get better results. You will have to use the data you are being given to get potential customers for your website.
Want your website to stand out and be on the top? Make your Google Adword account, sit back, and wait patiently.
Ad campaigns require patience. You will not see the outcomes immediately, but once you start getting better CTR, analyze the data, review your ads, and eliminate the ones that are not effective. It will increase your ROI, get you more traffic, and make optimization your habit. Adwords campaign optimization is definitely not a one-time event!
Liza Brooke is working as a Content Strategist and Digital Evangelist at Dissertation Assistance. She has worked for many renowned websites. She even shares digital marketing strategies on her social media platforms. Her keen interest in writing allows her to create content that people actually want to read.
Some people think that blogging is dead – but those people just don’t know what they’re doing when they blog.
A micro-niche blog is a fancy name for a blog that has an ultra-specific focus on a certain topic. For example, think of a food blog focused on egg omelet recipes only: it’s a micro-niche of cooking that sparks interest with people who love an egg omelet, or those looking for creative new takes on seemingly simple subjects.
Choosing the Right Micro Niche
Choosing a niche is important. It can be complex to discover, but well worth it. After all, this niche sets the tone for your blog and determines how much you will be able to get out of it.
First, you need to understand that a micro-niche is very much a thing of its own.
However, micro niches are all tied to a wider niche. For example, we mentioned egg omelet recipe ideas earlier. It’s a part of cooking, but still only focused on breakfast food. Think of a subset of an interesting topic you think could use a unique new twist.
If you like technology, then you need to find where your interest belongs in a micro niche. The technology market is a wide arena, so you need a small sub-topic you’re interested in. You can focus on only the best processors for computers, for example.
When you come up with several micro niche ideas, you need to analyze how well they perform. Research and find out:
The search volumes for the niche
If there’s a lot of competition
The sites that perform the best in this niche
If there are potential affiliate products
Studying the Audience
No matter what kind of blog niche we are talking about, you need to know your audience. It’s especially important when choosing a micro niche that has a smaller number of highly engaged followers. It’s essential to figure out whether there is enough of an audience for the niche you choose.
If you are writing about CPU processors, you can’t write for everyone who’s into computers. You need to write just for an audience who is particularly curious about your micro-niche.
Learn about that audience and what their needs, preferences, likes, and dislikes are. This will help you brainstorm relevant topics and keep readers engaged. Without an engaged audience, your micro-niche may go ignored.
Understanding the Ranking Advantages of Micro-niche Blogs
Niche blogs are already really competitive. For example, smartphones are a popular niche, and there are tons of blogs already covering it. For someone starting a blog for the first time, it can be difficult to rank high in these satura
The beauty of micro-niche blogs is that there isn’t as much competition. There are also a variety of specific topics to focus on that nobody is writing about.
If you publish blogs that offer value and contain the proper keywords, you will be able to rank your micro-niche articles in a couple of months. When you do your keyword research, it’s best to look for long-tail keywords that have a monthly search number under 1000 and not much competition.
It makes the whole ranking process a lot easier and quicker.
Web Design Factors
Like with any blog, web design is something to consider. Yes, the contents of your blog need to offer value; however, if your blog isn’t designed to look appealing and doesn’t function well, nobody will want to read anything on it!
Here are a few web design factors to consider:
Domain
Ideally, you want to find a domain name that matches your keyword exactly to rank quickly on search engines. With micro-niche blogs, this is easier to achieve, as there is far less search competition.
At the same time, these domain names are cheaper because not many people want them. If not, look for a partial match or some other keywords you plan on using as well. It’s important to optimize your site from the start. When you add more content structured with the same keywords, ranking higher in the SERPs will be a breeze.
Hosting
Hosting determines the speed, security, and the level of control you have over your blog. Depending on the platform you use, there are different ways to go about hosting. For example, most blogging platforms usually have their own hosting.
However, when you are looking for a new domain of your own, you’ll need a third-party hosting provider. When doing your research, look for these factors:
Fast speed
Reliability (no servers crashing)
Back-ups by the host
Ability to peform your own back-ups
Themes
Since you’re probably not a designer, you won’t design your blog’s site on your own. Luckily, depending on the blogging platform you use, there are lots of theme plugins to choose from. Themes are pre-made designs that you can instantly apply to your blog. Once you’ve installed a theme, you can further customize it to give it a personal look and branding.
The most popular blogging platform is WordPress, and we suggest going with them as well. One of the reasons for its popularity is the large number of free plugins you can choose from, like themes.
UX elements
What is UX (user experience)? It’s the way someone will feel on your blog and how easy it will be for them to find their way around it. Yes, your blog needs to look good, but it also needs to be functional and logical.
Adding a lot of buttons, functionalities, and visuals might look nice to you, but people will have a hard time navigating your blog with all the crowding. Consider the layout, clarity, and structure when setting up your blog. Here are some UX tips:
Space things out on the page
Increase page margins
Add large fonts that are easy to read
Organize content logically
Logo and other branding elements
Branding your blog is a must. It’s how you stand out from the rest and make yourself memorable. First, come up with a memorable name as a blogger. Something that’s easy to digest and remember. Your domain and URL should also fall in line with your brand, and be easy to spell.
Take the time to create a logo that fits in and unifies all the visual elements. At the same time, it should be easy to remember and mirror your brand voice.
The color palette should be uniform and look cohesive. Use two types of fonts that pair well together and emphasize the context or importance of your posts.
Content plan and calendar
Yes, blogging is creative, fun, and interesting, but it also should be disciplined and organized. A content plan outlines all the relevant information about what you are writing, who you are writing for, why, and in what way.
Your editorial calendar will feed on your content plan. An editorial calendar is where you add the time and date new blog posts launch. Here are some important things to consider in regards to your content plan:
Content quality
Quality content is about two things: readers and search results. You need to honor them both if you want your blog to grow. First, you need a good topic. Always be brainstorming for new content ideas. Organize ideas in a list or in your content plan for future use.
Do proper research on the topic. Always try to bring value to readers and tell them something they didn’t know, at least partially. Work on your writing style. Make sure to fix your grammar and proofread.
Your content
When it comes to content types, there are many options, like blogs, how-to posts, guides, and so on. All this has a role of its own. However, when we say the word types, we mean two important things:
Longer (expert) articles that offer in-depth information on a certain subject with a minimum of 1500 words.
Shorter posts that give quick essential information on a subject (up to 700 words).
Shorter posts let you publish more often, which helps you make the most out of your keywords and rank. Additionally, Google loves regular activity and will reward you for this.
However, a few long articles a month help you give thorough information to people who need it, and those reading micro-niche blogs often do. It all depends on what your readers like and the depth of information they’re looking for.
Publishing consistency
Short posts can be published on a daily basis, but you don’t have to be that frequent with your posts.
To start, a good number of blog posts is three short ones per week and an expert article every two weeks.
See how it goes and pick it up from there. Establish a calendar and stick to it. Your readers will get used to you publishing regularly, so it’s important to be active and keep the momentum going.
Content promotion
Publishing your micro-niche blog post on its own isn’t enough. You need to promote your work regularly. The more people that see your posts, the better, even if they aren’t interested so much in them.
Here are some of the best ways to promote your content:
Optimize your blogs for SEO for more organic traffic
Reach out for guest posts
Share content widely on social media
Used paid promotions on social media
Add your blog links to your online profiles
Repurpose content to increase shareability
Monetization
Naturally, the goal of your micro-niche is to make money. Still, you can’t expect to start doing this within the first year. It’ll take hard work to get your blog to a place where you can begin monetizing your content.
Once you’ve created a base of readers, you can use this readerbase in different ways to monetize your blog. Here are some of the most popular monetization options:
Affiliate marketing
Affiliate marketing is the most popular method of monetization for blogs and websites. At the moment, this industry is worth over $12 billion. It’s simple: as a blogger, you advertise other people’s products on your blog. (Source)
The affiliate links track the number of successful sales, and you receive an agreed commission for each sale that comes from your blog. It’s a very popular model because it doesn’t involve stocking products, taking orders, doing customer service, and so on.
AdWords
AdWords are paid search results that rank according to keywords used in searches and relevance. AdWords can help you drive tons of traffic to your blog and boost your overall results.
This can be especially effective if you sell products directly on your blog. With more traffic, you can increase conversions and boost your sales.
On the other hand, if you are doing affiliate marketing, you can increase your ROI through AdWords while also gaining potential readers in the long term.
Guest posting
Essentially, there are two ways you can make money by guest posting:
You can post on someone else’s site for a fee. If you are good at blogging, larger blogs will want to hire you as a guest writer, which means that you can share your experience with a new audience.
Let others post on your blog and pay you for the spot. When you grow a large enough blog that generates lots of traffic, people will reach out to you. They will want to guest post and get their name recognized from your blog.
Tools to help your micro-niche blog succeed
Every blogger needs tools to grow. These tools will help you do your job better and easier. This is especially important if you are doing everything on your own. Here are some of the tools that can be extremely helpful to grow your blog:
Grammarly is a plug-in spelling and grammar tool. It can be used if you are writing in Google Docs, Word, and many other writing tools. It checks your writing for clarity and correctness and automatically suggests changes.
This WordPress plugin is very easy to use. It helps you look at your blog posts from an SEO angle. You can learn what you need to pay attention to when optimizing blog posts, keywords, and structure to see better SEO results.
Sumo is probably one of the most popular blogging tools. With Sumo, you can run different analytics, add email forms, sharing buttons, and even test out blogging templates. It can help you optimize your content to see better results.
Pixels is an online stock photo gallery. It offers royalty-free images that you can download for free or a small price. It’s essential to spice up your blog posts with quality images and unique visuals to offer a better experience and to help you rank with meta tags on your images.
Naturally, these are just some of the initial resources that we suggest. But there are many more tools you need for blogging, so make sure to choose those that work the best for your micro-niche blog.
Bottom Line
This is just the beginning of your blogging efforts. As time goes on, you will naturally keep learning and developing your skills. As a blogger, you need to do more than just write: you need to understand analytics, use blogging tools, do your own marketing, and write engaging posts. Be prepared to become the jack of all trades.
Need more? Feel free to check the Nichehacks blog for additional content on how to find a micro-niche for your blog and grow it.
Among all of the marketing methods that you may have come across for your business, nothing works quite like the combination of traditional and digital marketing methods. It serves as the most effective medium for maximum outreach, and it also paves the way for converting your leads into surefire sales much quicker.
Through the use of marketing tools and resources that are available in today’s marketing landscape, you can easily combine traditional and online marketing strategies to design an all-around campaign that engages with a wider customer base.
Let’s have a look at how you fuse the two marketing methods together and use them for your business.
Digital marketing involves the use of technology and devices in your marketing campaigns. These devices include smartphones, laptops, internet, cloud services, etc. Some examples of digital marketing are search engine optimization (SEO), social media marketing, email marketing, content marketing, and various others.
Companies use online platforms to build up a strong image for their brand, and they do this through several means, such as targeted ads, organic social media marketing, posts, YouTube videos, and many other methods.
There are numerous advantages that businesses can experience by making use of digital marketing, including a global outreach without costing an arm and a leg. Moreover, it also allows companies the opportunity to penetrate new markets and generate new leads. Hence, they are cost effective and it is also easier to measure their success.
Plus, digital marketing methods often show quick results and they also provide you with clear and measurable statistics, so that you know where and how your money is spent, as well as who your customers are. You can also tailor the target of your marketing campaigns whenever you need to, and you have complete control over every aspect.
Traditional marketing refers to all of the advertisements and promotional material that you see around you, on signboards, flyers, brochures, radios, and even on the television. Basically, it refers to any marketing strategy that involves offline methods. This can also include sales calls, visits by salespeople, newspaper ads, and much more.
Traditional marketing methods also have a massive outreach, but the only difference is that you can only estimate how many people have seen or heard your ad. The only way that you can measure the success of your marketing campaign through your sales figures. However, traditional marketing is still considered more credible and effective by consumers, and it helps you reach a wider target audience consisting of various age groups.
One of the strongest mediums of marketing is through word of mouth, and it is brought about by traditional marketing. Moreover, it also helps build engagement and interactions with consumers.
The Benefits of Combining Digital and Traditional Marketing
Being a business owner, you have to make the tough choice of which marketing method you should channel your money towards, and you have to spend your budget wisely. This is why you can’t try everything that you hear about. Normally, new companies and startups focus on digital marketing while more established companies tend to gravitate towards traditional marketing.
Moreover, companies that find the “sweet spot” – the perfect combination between traditional and digital marketing – can truly benefit from this. Here are some of the other benefits that your business can experience from it.
Wider Outreach
The first step towards designing a marketing strategy is to determine your audience and think about what they need. Consider an older and well-established brand that has been using traditional marketing for the past few decades. If they want to reach out to customers aged between 18 and 35, they would have to employ digital marketing strategies too.
However, this doesn’t mean that they can do away with their existing traditional marketing campaign. Otherwise, they may lose out on their existing customers or even lose credibility. Some brands have suffered from this, including Pepsi when they shifted towards digital marketing in 2012. Therefore, have a multichannel approach works best in this regard.
Better Customer Relationships
As we know already, traditional marketing offers better outreach and also helps build credibility, but digital marketing has proven to be more effective in building customer relationships. Most companies integrate digital marketing into their existing marketing strategies and also keep the traditional elements intact.
This helps your long-term customers enjoy the same experience that they are familiar with, and the new digital marketing channels help them offer their customers a streamlined and user-friendly experience as well. It serves all types of customers, whether they are looking for something tangible or intangible.
Engage Customers Actively and Passively
Traditional marketing is considered to be more of a passive medium, whereas digital marketing is active as it enables customers to engage and interact with the brand directly. You can use a hybrid of both methods to build brand awareness and credibility, just like most recognized brands do. They design a unified content strategy for all mediums, and this helps them get through to the customers through different channels.
Moreover, you can also engage your customers to engage with your campaign by generating their own content that is centered around your products. This can blend in perfectly with your digital marketing medium and help you make your campaign a rousing success.
Conclusion
There are endless ways in which you can combine traditional and digital marketing to develop a personalized marketing strategy. It all starts with recognizing the importance and benefits of merging both methods, and applying it to reach out to a wider audience.
The Walmart Marketplace is becoming a real force to be reckoned with in eCommerce. And it’s growing at a rapid pace. In Q2 2020, total online sales increased by 97% YoY.
In this post, we’re going to cover the Walmart Marketplace, fees, pros, and cons, compare it to Amazon Seller Center, and show you how to quickly set up your own account and start selling more products.
Walmart: Going Big on eCommerce in 2021
Most of you already know of the retail giant Walmart, but it may not be the first thing that pops into your mind when you think about platforms to sell more products online.
But with the wild growth in 2020 and 2021, the online Walmart store is becoming one of the leading players in the market.
Over the past few years, the total online sales have more than doubled, with a forecasted 43 billion dollars in online sales in the US alone in 2021.
Part of the reason for this growth is the pandemic, sure, but Walmart’s leadership has also invested heavily in the transition to eCommerce.
Walmart has invested billions of dollars in successful eCommerce brands, most notably acquiring ecommerce retailer Jet.com for $3 billion in 2016.
Jet.com was never commercially successful itself, but it developed the core infrastructure that Walmart needed to make a big move in eCommerce, including an API that likely helps power Walmart Marketplace today.
Walmart has continued to acquire brands over the past few years, and the company is now using the expertise of those founders and staff to help grow its own business.
Direct-to-consumer clothing brand Bonobos is just one example of more recent acquisitions. This time, Walmart “only” had to spend $310 million.
One of the easiest ways to notice the impact of these investments is to pay attention to the transformation in the user experience of the walmart.com site.
Today, it’s an easy-to-use online shopping site, not really any more clunky than the established giant, Amazon.
The unique advantage Walmart has over Amazon is that it can offer store pickup (curbside pickup these days) for thousands of locations around the country. (Though this doesn’t help you unless Walmart decides to carry your product on its shelves.)
What Is the Walmart Marketplace and Why Should You Care?
The Walmart Marketplace is the equivalent of Amazon Seller Central, Walmart’s way to let third-party sellers offer products on their platform for a fee on each completed sale.
It lets individual store owners or brands sign up directly on the official site, and start offering their product catalog directly on walmart.com.
Once Walmart approves your account, consumers can see your products when browsing categories or searching for something specific in the online store.
If you want another channel to sell even more products online, Walmart Marketplace is exactly what you’ve been looking for.
Walmart’s online store now ranks #3 globally in terms of online sales volume. If you’re a (mainly) online retailer, or a brand, that’s something you can’t afford to miss.
While Amazon is still bigger, Walmart’s online sales are growing faster and starting to catch up to its main competitor.
How does Walmart Marketplace work?
Walmart Marketplace works as a relatively open platform for third-party sellers (as long as they have a registered business in the US or Canada).
To start listing your products, you need to follow the following process:
Sign up for a seller’s account and apply.
Get approved during the manual review process.
Start listing and selling products in the Walmart Marketplace.
Pay Walmart a fee for each sale.
There is no up-front signup fee or ongoing subscription cost to become a seller. Instead, you pay a percentage of the sales for each product.
Note: The specific percentage varies with product category and price, but 8% is quite common for a lot of products.
So, in essence, you get access to a whole new potential audience for your products without having to invest in an expensive (and risky) marketing campaign.
All you have to do is sign up and start selling your products on Walmart. Now that you understand a little bit more about what the Walmart Marketplace is, let’s talk about requirements.
What do you need to sign up and get approved by Walmart’s audit team? Let’s find out.
Walmart Marketplace Requirements: What Do You Need to Start Selling on Walmart?
The Walmart Marketplace requirements are a lot stricter than the requirements for its affiliate program.
The reason for that is simple: Walmart is going to be selling physical products that you supply. That comes with a much higher level of inherent risk than simply letting someone advertise its products.
In general, Walmart Marketplace is only open to US-or-Canada-based businesses (or companies with a US or Canadian subsidiary), and requires the documentation to prove it.
So here are the things you need to apply for your Walmart Marketplace account today:
The US or Canadian Business Tax ID
Unlike with affiliate marketing services, your private SSN just won’t cut it. You need a unique US business tax ID to sign up.
If Walmart’s sellers don’t pay taxes, Walmart doesn’t want to have to get into arguments with the IRS. (Unlike Amazon, Walmart actually pays its taxes.)
It’s not enough to just have a business tax ID, either. You need to prove, without a shadow of a doubt, that you have a registered, legitimate business in the US.
A Confirmed US Business Address With a W9 or W8 and an EIN Letter
The next thing you need is a confirmed US or Canadian business address, complete with W9 or W8 tax ID forms, and an EIN verification letter.
The EIN verification letter from the Department of Treasury verifies your business and its location.
If you don’t have an EIN number or letter yet, you can apply for it online through IRS’s official website.
The process is fairly straightforward, but unfortunately, it does take the Department of Treasure some time to process requests.
So if you don’t have one of these, the first step can delay the signup process considerably. Once you’ve proven that you have a US business, it’s time to show that you have products relevant to walmart.com for sale.
A Comprehensive Digital Product Catalog
The next necessary item is a digital catalog of all your products. It must include SKUs, product categories, and no prohibited products (for example, alcohol or prescription medicine).
You can look at Walmart Marketplace’s official product catalog template to learn more about its required information.
Note: When you’re adding products during the signup process, do not add any test items. The catalog must only include real products, as they’ll automatically show up on walmart.com when your account is approved.
An Easily Confirmable Record of Ecommerce Success
Walmart needs to be able to see that your products actually sell and that you’re worth having on its marketplace. This is one of the considerations during the manual review process.
For example, if you’ve got a well-reviewed storefront on Amazon, that will help you get through the approval process.
If you exclusively sell your products through your own website, showcasing confirmed reviews and other social proof will help your case.
Many potential sellers also wonder if it’s a requirement that the products they sell are new and unopened.
Shipping Requirements
If you opt to fulfill your own deliveries, there are a few requirements to note (if you want to remain a seller).
You cannot use any branding or logos on the packaging or include any marketing materials (other than Walmart’s) in the packaging beyond your product.
You must offer at least two of Walmart’s approved shipping options: Value (3–7 days) and Standard (2–5 days). You can also offer expedited, 2-day, and next-day shipping options.
(Source: Walmart Marketplace)
If you can’t meet these requirements, you will either fail during the initial review, or lose your account as soon as the auditors notice.
Customer Service Requirements
Walmart Marketplace also mandates a certain level of customer service from its vendors.
You must answer all customer service emails or questions within 48 hours of receiving the message.
The response must be “high-quality” and written by a human. No chat bots allowed.
You must supply phone support in English.
You can’t register a cell phone, residential phone, or internet phone service number. It must be a real office number registered in the US or Canada.
Can You Sell Used Items on Walmart Marketplace?
The short answer is yes, you can sell used items on Walmart Marketplace. While you can’t sell any used or opened cosmetics products or other perishable items, other used items are fine.
Used items aren’t mentioned in the “prohibited product categories” list, and you can quickly find marketplace sellers who are indeed selling used products on the platform.
Used sports equipment, for example, is a fairly large and established niche in the online store, though it doesn’t have its own category.
Used golf balls, in particular, seem to be making someone a nice chunk of change.
So basically, as long as the products are non-perishable and you specify that the products are used, you’ll be okay.
Of course, unless you have multiple used products that fall under the same label, you may have an issue establishing a popular product (as reviews are crucial for making sales and getting prioritized in the search results).
Walmart Marketplace vs Amazon Seller Central
To show you the benefits of the Walmart Marketplace, let’s compare it to the industry standard, the Amazon Seller Central.
Referral Fees
For most inexpensive products, like books and toys, Walmart charges a 15% referral fee for all sales.
On higher-priced items like cell phones and other consumer electronics, it typically charges 8%.
This is comparable to Amazon Seller Central referral fees, which also tend to stay between 8 or 15% (except for official Amazon device-related products).
With Amazon, however, you also have to pay a flat $0.99 selling fee for each sale, or pay for a monthly $39.99 subscription to sell on Seller Central.
That’s actually the main difference in fees and pricing, because Walmart charges no additional fees beyond the commission.
Of course, if you sell thousands of products, $40 per month is nothing. But for someone just starting out on their eCommerce journey, it could make a difference. (Although if you’re scared of investing $40, you shouldn’t be embarking on an online business adventure.)
For large vendors, though, the fees are virtually identical for all intents and purposes — which is a nice benefit.
It means that you won’t have to change your pricing between platforms to maintain your profit level.
Fulfillment
If you don’t want to fulfill your own online sales, you don’t have to. Both Amazon and Walmart offer fulfillment options.
Amazon has FBA (Fulfillment by Amazon) and Walmart offers WFS (Walmart Fulfillment Services)
The prices are very competitive, and in some cases, Walmart actually comes out on top. The only issue is that FBA caters better to vendors who sell a lot of smaller items.
WFS prices:
$3.40 per item under a pound
$0.75 per cubic feet of storage per month
FBA prices:
$1.97 per item under 4 oz. (113 grams) ($3.48 for items up to a pound)
$0.75 per cubic feet of storage per month
As you can see, Walmart is slightly cheaper for items under a pound, but it doesn’t offer a lower price tier for smaller products.
So if you sell small, inexpensive items, Amazon Seller Central is the clear option here. However, if you sell larger, more expensive items, WFS is just as good, if not better.
Now that we’ve looked at their fees, and realized they’re virtually the same, let’s examine the sales potential of the different platforms.
Sales Potential: Site Traffic and Sales Volume
First, let’s take a look at the traffic. We analyzed both amazon.com and walmart.com using a website statistics tool called Similarweb.
According to the results, Amazon has over 5x the amount of monthly traffic of Walmart. Amazon.com gets over 2 billion monthly visits, versus “just” 430 million for walmart.com.
(Source: Similarweb)
Now, that’s a huge difference in the number of potential customer eyeballs that you can potentially put your product in front of.
When it comes to online sales volume, we also see the same story.
Amazon expects $100 billion in online sales in Q1 2021. That’s more than double Walmart’s entire 2021 eCommerce sales of $43 billion dollars (that we highlighted in the graph in the introduction).
Still, over $10 billion dollars of eCommerce sales per quarter is nothing to scoff at. Even though it’s smaller than Amazon, it’s still a force to be reckoned with.
You wouldn’t say any thank you to a piece of a 43-billion-dollar pie, would you?
Competition
As the best-established marketplace for online sellers outside of eBay, there are a lot of registered sellers to compete with on Amazon.
There are literally millions of sellers on the platform (over 9 million registered, and 1.9 million active sellers, according to Marketplace Pulse).
On the other hand, Walmart Marketplace has yet to break 100,000.
(Source: Marketplace Pulse)
That means you may have a lot less competition on the platform. There’ll be a lot fewer independent vendors selling the same products.
If you sell products in obscure categories, this can be a huge help, as your listings may automatically show up closer to the top of the search results.
The battle for the buy box is a lot easier when fewer sellers are trying to underbid each other.
Reputation and Future Prospects
Since Walmart is raising the company’s minimum hourly wage to $15 for over 700,000 workers, there’s a brand position play you can make by partnering with Walmart over Amazon.
At the same time, while Amazon is getting a lot of bad press and negative publicity and social media coverage, it’s posting record sales numbers quarter after quarter.
Can you really afford not to have your products on the biggest online marketplace in the world?
Both Walmart and Amazon are predicted to continue growing at breakneck speed as the transition to online and omnichannel shopping continues.
So the best idea for most companies and entrepreneurs is to use both platforms to sell more products.
If you’re worried about Walmart’s reputation as a discount grocery retailer, you shouldn’t be. That’s not how Walmart operates online. The online store includes a wide range of products, including premium ones that appear to sell quite well.
Walmart Marketplace Pros and Cons
So to wrap things up, let’s boil everything down to pros and cons, and conclude whether you should sign up for Walmart Marketplace.
Pro: Low Competition
While “low” might be a stretch if you’re in one of the popular product categories, there’s definitely a lot less competition than on Amazon, especially in obscure categories where Amazon FBA niche businesses thrive.
One crucial marketing concept is known as “first-mover advantage,” where the first company to release a certain product, or reach a certain market has an undeniable advantage over all competitors.
If you can be the first person to start selling a niche product on Walmart, you can stock up on reviews and sales rank, and other products (even from established companies) will struggle to catch up on the platform.
Pro: Growing Marketplace With a Lot of Potential
With a more than doubling sales volume over the past year, it’s no longer a platform you can afford to ignore.
No matter which type of products you sell online, there’s starting to become a market for it on walmart.com.
In the US, more and more people are taking advantage of curbside pickup to get products they want. They don’t want to risk packages being stolen from their front door, which is getting alarmingly common. In 2020, 1.7 million packages were stolen or went missing every single day. And that’s just in the US.
Walmart definitely has the omnichannel retail advantage, and is starting to gain a following with a more affluent shopping audience, not just discount shoppers.
Pro: Identical Fees as Amazon Seller Central from Category to Category
If you’re already on Amazon Seller Central, there’s no need for adjustments. You don’t need to change your prices, budgets, or how you calculate profits.
Virtually all fees from category to category are the same. Just take a look at the table below.
Category
Walmart Marketplace
Amazon Seller Central
Camera & Photo
8%
8%
Books
15%
15%
Consumer Electronics
8%
8%
Video Game Consoles
8%
8%
Furniture
10-15%
10-15%
Baby products
8-15%
8-15%
Pro: Get 30 days of Commission-Free Sales (If You Sign Up Now)
Walmart is running a campaign to get more serious online retailers and brands onto its platform. If you sign up for the platform now, you can get 30 days of sales on walmart.com without having to pay any commissions at all.
The deadline is June 30, 2021.
Con: Lower Overall Sales Volume
Compared to Amazon, the main competitor, Walmart does sell a lower volume of products online. There’s no getting around that fact.
But the platform still does billions of dollars in sales every single year. Can you afford to just ignore the second-largest eCommerce marketplace in the US?
Con: Only Available for US- or Canadian-Registered Businesses
Unlike Amazon Seller Central, companies only registered in major EU countries have no quick and easy way of signing up for the platform and starting to sell their products.
You must first register your company through the W8-ECI form to start paying corporate taxes in the US.
It doesn’t matter if you’re a legitimate business with a respected brand. To circumvent it, you either need to set up a US subsidiary, or find an existing Walmart seller to partner with.
Con: Strict Manual Review Process
Walmart Marketplace has a fairly strict manual review process, and only wants to partner with serious online retailers or brands.
If you don’t have an established online presence, like an online store that easily shows up when Googling, or an established Amazon storefront with positive reviews, you may not pass the manual review process.
If you do have an established online store, then this turns from a con to a pro, as this manual review process is part of what keeps the level of competition lower than on Amazon.
Con: Price Pressure to Go to the Bottom
If you can’t offer “Walmart-friendly prices,” Walmart may reject your application, even if you’re an established brand with a lot to offer.
This doesn’t mean you have to sell cheap products, but that your prices are less than 25% higher than vendors for directly competing products.
For example, if you sell leather furniture, it can’t be 5 times more expensive than the next store.
All in all, the pros far outweigh any of the minor cons, unless you’re a European company looking to sell more products within the EU.
6 Steps to Register Your Walmart Marketplace Account and Start Selling
Hopefully, we’ve now convinced you that Walmart Marketplace is a great place to list your products and start landing more sales.
To get started, follow the simple 6-step registration and application process below.
First, you need to start off by getting your documentation in order.
Line up Your Required Documents
The first thing you need is proof that you have a legitimate business in either Canada or the US.
You need concrete proof of your US or Canadian business address. In the case of the US, you need an EIN letter and a W9 or W8 form.
Canadian businesses can include a copy of their business license or Government of Canada business registration details.
You must also:
Have UPC (unique product code) codes for all your products.
A digitized product catalog that includes all the required information. (For example, specifying the product status, like new, used, or refurbished.)
If you don’t have any of these things lined up, you need to get them in order before you apply.
Start the Application
Once you’ve got the required documents and information lined up, you can go straight to the signup page and start the process.
Note: the application process varies a bit, with the Canadian form requiring you to specify your eCommerce experience, not just submit your documents and company information.
Register Your Company and Main Contact Information
The first step is to register your company and submit the required documents we mentioned earlier.
It’s a straightforward process, as long as you have all the required information in front of you.
Just fill out the main contact information, your role at the company, and all the various company details like the year it was founded, whether it’s registered on the stock market, name, etc..
Describe Your Product Catalog (And How You Plan to Upload It)
Once you’ve registered your company and tax information, you go straight to describing your product catalog, and how you plan to integrate it.
For example, you need to clarify if you sell luxury or software products, what percentage of your products are used or refurbished, and how you plan to upload your product catalog or integrate with the Walmart Marketplace.
Walmart Marketplace supports integrations for major eCommerce platforms like Shopify and third-party fulfillment services like Deliverr, Shipbob, and Shipworks.
Specify Your Shipping Carriers and Add Warehouse Addresses
The final thing you need to do is specify which shipping carrier you use, and where your warehouses are located.
On this page, Walmart also includes a little box for you to explain why you’d be a good fit for Walmart Marketplace.
Briefly explain:
Your previous eCommerce experience and success (if possible).
Why your product catalog is a good fit for Walmart.
There’s no need to into your brand’s life story or your desire to reach a larger audience. Just keep it simple.
Wait for Approval
Once you’ve completed all these steps, all that’s left to do is to wait for approval. The manual review process can take up to 4 business days, so be patient.
10 Best-Selling Walmart Marketplace Products You Can Learn From
Kinbor Patio Furniture Set
This particular product is one of the best-selling products of a Walmart Marketplace and Amazon Seller Central seller who specializes in outdoor furniture.
Kinbor isn’t an established, well-known-and-loved brand. It’s just a well-marketed product with professional images, and a good seller reputation.
It proves that with a unique product (in an eye-catching color), you can stand out without having a recognizable brand name.
EEEkit Boxing Gloves
More than anything, EEEkit boxing gloves prove the power of price anchoring and a low price. The registered “list price” for these gloves is over twice as high as the price they’re selling them for on walmart.com
If you have certain products where you know you’re clearly winning on price, Walmart Marketplace is the perfect place to list your products.
It also does one other thing well — showcasing the product both in use, and in different colors.
Cat Dancer Pet Toy
Pet supplies and pet toys are actually one of the stronger categories on Walmart’s online store, and may even rival Amazon in terms of total sales volume.
This Cat Dancer toy from a marketplace seller wins out among all of Walmart’s preferred brands.
Again, the sales profile isn’t amazing, but it does showcase the potential impact of a fun, low-priced product listed on the Walmart Marketplace.
It also showcases the value of quick, pain-free shipping and delivery. Part of the reason it has such strong reviews is not just the product, but that the seller got the product to the customer as promised.
Pioneer Woman’s Pantry Set
But if you do your marketing and branding right, not everything needs to be the cheapest thing on the market.
The blogger and influencer that goes under the moniker “The Pioneer Woman” successfully sells a pantry essentials set for $60 on Walmart marketplace.
It just proves that if you can build a following online, you can successfully launch a brand anywhere, at any price.
Marketing and branding outside of the eCommerce platform is just as important as optimizing your listings and paying for ads.
Rothco Cargo Shorts
Rothco’s cargo shorts show the importance of selecting products that resonate with the main customer bases of Walmart.
They successfully sell a lot of military-themed clothes, none selling better than these “paratrooper cargo shorts.”
Of course, military enthusiasts aren’t the only people in Walmart’s customer base.
When doing customer research, you should try asking your customers where they shop, and in this day and age, most people will probably include Walmart on that list.
But the core audiences for Walmart are still regular, hard-working Americans who are looking for a deal (or a product that resonates with them).
If you can’t win on price alone, you can win by choosing the right products for the platform.
IQAir Air Purifier
IQAir’s GC Air Purifier is the perfect example of an expensive specialty product that is thriving on walmart.com.
Because some people may need it because of their living circumstances or allergies, it’s hard to call it a luxury product, but with a price tag of $1,299, it’s not your average air purifier.
With a robust multi-channel marketing campaign and a stellar customer reputation, IQAir manages to sell a comparable amount of products as the average 40-buck air purifier (that doesn’t do much).
If you sell expensive specialty products, don’t be afraid to give Walmart Marketplace a try.
Veradek Planter
The Veradek planter (the #1 best seller in the planter category) is far from an “as cheap as you can get” product.
Instead, it shows the power of a unique design and standing out from your competition. If your brand (or the products you carry) have this quality, you can do well on any marketplace you list your products on.
Zodaca Tote Bag
The Zodaca tote bag shows the power of a unique product at an affordable price on Walmart marketplace.
If you’ve got something fun that costs $10-20, it may very well go on to become a best seller.
Also make note of the product title. Just like on Amazon, it pays off to include as many identifying adjectives as possible.
Have you ever heard of a lightweight, all-purpose shoulder bag?
Don’t be afraid to experiment with titles.
Clatina Desk Organizer
This next desk organizer doesn’t live off of the brand impact or marketing it does on other channels.
It’s become a successful product on Walmart Marketplace alone.
It’s a simple, fairly-priced product that looks good, and is titled in a way that helps it show up for a variety of searches.
It also features a lot of high-quality images of the product (though the text overlay is a bit uninspiring).
A winning product doesn’t need to look futuristic, as long as it works well and makes the customers happy.
Instead of competing for the buy box, carrying unique products is the best way to go for small retailers.
Brinley Co. Sandals
Brinley Co. is an online retailer (mostly Amazon and Walmart) that specializes in women’s footwear.
With high-quality products, good product images, and fast processing and shipping, they’ve landed multiple best-selling product spots for their shoes.
These sandals, for example, have a stellar reputation.
Critical Considerations
With rapid growth in Walmart’s eCommerce platform, it’s rapidly becoming a platform sellers can’t ignore.
With under 100,000 sellers, there’s a lot less competition than on Amazon Seller Central.
It has its own fulfillment platform, WFS, so you don’t need to handle shipments or warehousing yourself.
It’s not just a platform for cheap products — high-quality products at a fair price can do very well. (Like the $1,000+ air purifier and $75 planter we covered in the examples).
If you have a history of eCommerce success, it’s a lot easier to get approved as a Walmart seller.
Final thoughts
With the growth that Walmart is seeing on their online platform, the Walmart Marketplace is no longer a platform you can afford to ignore.
As a small business owner or entrepreneur, getting started and starting to sell on Walmart Marketplace can seem like a long and complicated process.
But once you get down to it, it’s actually quite simple. Just follow the steps outlined in this guide, and you’ll be up and running in no time.
If you want more information and ideas on how to sell more products and make more money online, join our exclusive NicheHacks community.
Frequently Asked Questions
How Long Does It Take to Get Approved to Sell on Walmart?
The manual review process should take between 1–4 business days. So after the application, you could be an approved Walmart seller by the next day. If it takes longer than a week, you may want to reach out or apply again.
Is Selling on Walmart Marketplace Worth It?
Selling on Walmart Marketplace is definitely worth it, as it’s grown to become the second largest online retailer in the US. Why wouldn’t you want access to a potential 450 million extra monthly customers?
Who Can Sell on Walmart Marketplace?
Any business registered in the US or Canada with a valid address, office phone number for customer support, and Tax ID can sell on Walmart Marketplace
What Are Walmart Marketplace Fees?
The only Walmart Marketplace fees are the sales commissions you pay when you successfully sell a product. The feest ranges from product category to category, ranging from 8% to 15%.
How Much Does It Cost to Sell on Walmart Marketplace?
It costs nothing to register or get started, but you pay a percentage-based commission on all sales you make on the platform. The percentage is typically between 8-15%.
But these types of jobs tend to be a one-time deal. Once the job is finished, you get paid for your work and you look for the next gig.
Wouldn’t it be nice if you could make money while you sleep?
You can with affiliate marketing — the process of earning a commission by promoting other people’s products.
The best way to get started is to build a niche site and drive traffic to it. Then you earn a commission when someone clicks on your link and makes a purchase.
Over the years, countless members of the Nichehacks tribe have asked me about a niche marketing training course for beginners called ‘Wealthy Affiliate’.
So I’ve joined and went through the initial free training modules and I’ve also upgraded to premium and checked out what’s on offer there.
And got stuck into their tools and resources and now I can advise you if it’s worth checking out or not.
Here’s my purchase proof…
This is my Wealthy Affiliate review…
It’s an interactive course (like an online training centre or niche marketing university) designed to take you from complete newbie to wealthy affiliate by turning your passions into a successful niche site.
Wealthy Affiliate has been online since 2005 and has over 1.4 million members (both free and paid) which says something about how trusted and valuable this course is.
The initial affiliate marketing training is completely free and consists of 10 training modules.
Then if you want to take it to the next level to access 30 more modules AND get use of their free website builder, tools, resources and community you can upgrade for just $49 a month
It works in 4 simple steps:
Choose your interest or passion.
Build an affiliate website (using their website builder and tools)
Attract visitors (using their SEO and traffic techniques)
Earn revenue from your passion (through affiliate marketing)
They have a series of video and text modules to guide you through each step.
On top of that, as a premium member, there’s also a ton of free tools such as a website builder, keyword research tool, and a link tracker to help you along the way and make things easy for you (more on those later).
As well as lots of training, modules, and classrooms to guide you on the right path.
Not to mention the Wealthy Affiliate community — there’s live chat, private messages, help forums, and webinars you can get involved with to get advice or encouragement from other members.
You even get one on one support from the owner’s Kyle and Carson when you’re a premium member – that’s incredible!
All the courses, training, and tools are available online so you don’t have to download anything or spend extra on software or tools like you usually would when carrying out niche research.
What Wealthy Affiliate is Not:
Not a get-rich-quick scheme — it takes time, commitment, and focus. Don’t expect to make thousands of dollars the next day without putting in any effort.
Not a push button, instant riches, program — you will have to invest time and energy into it to succeed as a WA affiliate.
Not MLM — no need to recruit others to make money.
Not blackhat bullsh*t — a perfectly legal and ethical way to make money online as an affiliate marketer.
No need to make your own products or stock inventory — you will monetize your niche sites through affiliate marketing.
Not a scam — it’s a genuine training program, with a community of over 1,400,000 members, that’s been online for years and shows no signs of going anywhere.
Wealthy Affiliate Member Features:
Tons of free affiliate marketing training and resources for newbie marketers meaning you can learn the basics of making money without spending a cent. But you can upgrade to Premium when you’re ready to take your learning to the next level.
In-depth training videos and text tutorials showing you every aspect of going from a newbie to an expert niche marketer. All the training materials are accessible right from the dashboard.
Keyword research tools available for free, so you don’t have to purchase one or pay monthly fees as you do with most tools.
WordPress-based website builder that you can use to build your affiliate niche website then either host on their servers for free or on your own using a premium domain name.
Content creator with guides on how to create content that converts and makes you money.
Lists of money-making keywords analyzed and evaluated for you.
SEO and traffic guides showing you exactly how to get targeted traffic to your site.
Pretty much everything a newbie niche affiliate marketer needs to get started and prosper online.
Lots of support options should you need help or get stuck, so you’ll never suffer alone.
Wealthy Affiliate offers excellent training to those that are still new to online marketing. Even if you don’t have any technical experience, you can build a thriving affiliate marketing business by putting what you learn into practice.
Who is Wealthy Affiliate For?
Newcomers to the internet marketing world who want to see success with niche and affiliate marketing — if this is YOU then Wealthy Affiliate is what you’ve been looking for.
If you’re not so new but have struggled so far to make money online (or don’t make enough) then Wealthy Affiliate might be what you’re looking for as it has in-depth training and tutorials to guide you through the process.
If you’re wondering “how do I get started?” then this is a great place to start. Wealthy Affiliate provides a comprehensive overview of all the basics from choosing a niche to creating a site and earning your first affiliate commission.
If you’re an experienced marketer who’s already making money online then there’s not much value for you here. However, you may find the Wealthy Affiliate community valuable as you can connect to other marketers and expand your network.
Students, retirees, stay at home moms (or dads) who want to bring in some extra income will get a lot of use from this.
Bloggers who currently aren’t making any money from their blog and need guidance on how to do it. The Wealthy Affiliate platform walks you through how to optimize your content and select a profitable affiliate offer for your niche.
Sure, you can learn to make money online without a Wealthy Affiliate membership. But searching for “affiliate marketing” in Google yields hundreds of millions of results. If you simply don’t have the time to research and figure everything out for yourself, then the Wealthy Affiliate program cuts out a lot of that mind-numbing research.
Wealthy Affiliate Pros and Cons
Pros:
Very newbie friendly so if you’re new to digital marketing or even the internet and not sure how to get started this will map out the exact process.
The in-depth video tutorials, lessons, and guides pretty much cover everything you need to know about getting started with niche marketing so you can start making money.
The community aspect of the site makes it easy to get help, advice, and encouragement from others in the same situation and from those who are advanced and successful.
Not sure where to find your affiliate link or stuck on something else? After asking a question in the community, the average time to get an answer is 1.8 minutes — that’s pretty impressive!
Free tools and software that would otherwise be expensive like the keyword tool, link tracker, and web builder. All of these tools are available with your membership.
Can turn almost any of your passions into a profitable niche site using the Wealthy Affiliate training course. And if you don’t know where to start, Wealthy Affiliate can also guide your niche selection with over 1,000,000 different niches.
There’s no other course offering so much in-depth training to newcomers as far as I know. This is a huge plus as you get all the affiliate marketing training you need from one place. And if you ever need a quick refresher, you can log back into the Wealthy Affiliate platform and refer back to those materials.
Will help you earn revenue through monetizing your passions and live the life you aspire to have — the laptop lifestyle aka freedom.
Lessons 6 and 7 in ‘level 4’ are some of the best training guides in the whole package IME as they talk about the power of social media networks.
Cons:
A lot of focus on SEO traffic (though not 100% they do cover other digital marketing channels like social media and PPC too) which is unpredictable and not guaranteed. It would be nice to see more training modules on other aspects.
Inside the training center, the page feels cluttered to me. Too much going on but that simply means there’s a lot of useful information so it’s not too much of a negative point.
You can use the SiteRubix website builder to launch an affiliate site and get started on your first blog post in a matter of minutes. But you’re restricted to their themes and it’s not easy to add extra functionality.
Building and hosting your site with Wealthy Affiliate also creates potential lock-in issues. You’ll need to continue paying for a premium membership to continue using those tools and services.
Support is top-notch.
There’s live chat, classrooms, interactions with other members and staff, a private message system, and more so help is ALWAYS on hand should you need it.
The owner’s Kyle and Carson are available online often solving problems —something you won’t see a lot with training modules like these.
There’s also personal 1 on 1 support with the owners if you decide to upgrade your free membership to premium — not many companies give you personal access to the CEO regardless of the price you’ve paid.
With over 1,400,000 members on board, all happy to help newcomers out the community aspect couldn’t be stronger.
Chances are you won’t need much help as the training is so in-depth and easy to follow that you’ll likely not struggle.
Now let’s get into how much Wealthy Affiliate costs and what you get with your membership.
Wealthy Affiliate Pricing and Guarantee
The initial 10 lessons are completely free without needing to enter any credit card details or payment info so you can check it out without any commitment.
The Wealthy Affiliate premium membership costs $49 per month and there’s no contract, so you can cancel at ANY time.
Or you can also purchase a yearly plan for $495 and save $93 or 16% instead of paying monthly. The plan automatically renews every year, so be sure to mark that date on your calendar.
Here’s a snapshot of how the free Starter membership compares to Premium:
The Starter plan is meant to give you an introduction to affiliate marketing.
You don’t get access to all the features, but you can go through the free training materials available and even get live 24/7 help for the first 7 days if you’re stuck or have questions about anything.
Here’s what you get as a Wealthy Affiliate Premium member:
120 in-depth lessons over 12 learning modules, so you can further advance your skills.
An easy-to-use SiteRubix website builder, so you can build your first site.
A free keyword research tool you can use to find profitable keywords and save spending money on premium tools.
Affiliate classroom and Bootcamp to further help you with your affiliate marketing and let you get access to help and advice.
Done for you keyword lists you can use to create sites around.
A bustling community, so you can chat, interact, ask questions and get help from the leaders and others in the community.
Affiliate program search, so you can easily find the affiliate offers to promote on your site.
You can save 16% by upgrading to yearly billing instead of month by month.
One thing you might be asking…
“Is the Wealthy Affiliate a scam?”
Not at all.
In fact, there are plenty of affiliate marketers who have used the training materials provided by Wealthy Affiliate to build successful online businesses and generate a passive income.
Let’s take a look at what others are saying about Wealthy Affiliate.
What Do Others Say About Wealthy Affiliate?
I’ve searched the net for genuine reviews…
“When I first joined this awesome community back in 2012 I didn’t have the first clue about what I would be doing. I just started going through the training and asked lots of questions and pretty soon everything started to make sense.
In a year and a half, I have been a member, I have learned how to build websites, and how to write content that will get ranked in Google, and bring me loads of traffic every day.
This same website has made me enough money that I have been able to free myself from corporate America and pursue my dream of working from home.” – aworkathomebusiness.com
“I recommend this program highly for any new entrepreneur and even for those who still struggle to earn a decent income from the internet.
I truly believe that the owners of Wealthy Affiliate have the right mindset into helping people to achieve their online goals.
The design is professional without flashy buttons, fake promises, or constant promotions.” – christene-marketing.com
“I have to say, I really doubted that was possible until I stumbled on Wealthy Affiliate.
But through clear and extensive step-by-step training (and their fun and informative weekly live webinar training…) this program taught me I really could make money online doing the things I loved.” – http://www.ivetriedthat.com
“For me, Wealthy Affiliate has been the bedrock for my affiliate marketing journey. It was one of the first training programs I took over 2 years ago and it really showed me how to run numerous successful affiliate websites.
Sure the prospect of “passive income” is an intriguing selling feature for affiliate marketing, but the reality is that it takes time!” – Jeremy Harrison on quora.com
Here’s a review that one user posted on Trustpilot:
Here’s another Wealthy Affiliate success story from one user who turned her Amazon affiliate review site into a 4 figure monthly income after one year:
These reviews of the Wealthy Affiliate program took me about a minute to find.
And you’ll find tons of success stories from others who have applied what they’ve learned to make money online with affiliate marketing.
Wealthy Affiliate offers a legitimate affiliate training program that takes you through the exact steps to building an affiliate site and earning your first commission.
Let’s take a closer look at the training that Wealthy Affiliate offers and what you can expect if you decide to sign up.
Wealthy Affiliate Training
The learning materials are at the heart of the Wealthy Affiliate marketing course. Let’s look at what kind of training is available from the dashboard.
Online Entrepreneur Certification
The Online Entrepreneur Certification (OEC) training consists of 50 lessons that are broken into 5 levels that teach you how to make money online with your chosen niche.
Be sure to get your pen and notebook ready because each section covers many aspects of affiliate marketing.
Here’s a breakdown of what’s covered:
Getting Started: Here you’ll learn more about the Wealthy Affiliate community. This level also helps you find a profitable niche and create your first website. You’ll also learn how to write your initial content and the basics of keyword research.
Building Your Own Traffic Producing Website: These lessons will teach you how to choose a domain and create keyword-rich content for your audience. You’ll also learn how to increase your site’s visibility online with search engine optimization or SEO.
Making Money!: Here’s where you’ll learn more about affiliate programs, how to sign up for them, and how to add affiliate links to your pages. You’ll also learn how to track your website traffic.
Mastering Social Engagement: There are an estimated 3.5 billion social media users worldwide. These lessons will show you how to use networks like Facebook and Pinterest to promote your affiliate site.
Achieving Maximum Success Through Content Creation: Publishing quality content to your site is key to becoming successful as an affiliate marketer. These lessons show you how to write your content in a way that gets people to buy.
If you’ve ever taken an online course through a platform like Skillshare or Udemy, then you’ll find the interface familiar.
What I like here is there’s a clear progression system in place. You can see how many “tasks” or lessons are in each level and how far along you are.
In each lesson, there’s a checklist on the right-hand side of what actions to take. Simply check the box after completing a specific action and the system will keep track of them.
The article goes more in-depth on the benefits of buying a custom domain for your niche site as opposed to using a free blogging platform like WordPress.com or Weebly.
They also include a video that shows you how to buy a domain name with SiteDomains — a domain name registrar.
And at the bottom of each lesson is an open discussion. Here you can ask a question to the WA community if anything is unclear or view previous discussions to see what others have asked.
Affiliate Bootcamp
The Affiliate Bootcamp training materials consist of 70 lessons total that walk you through how to make money in the lucrative “make money online” niche. One of the main focuses is promoting Wealthy Affiliates’ own affiliate program.
Here’s a breakdown of what you’ll learn in this training module:
Getting Your Business Rolling: These lessons provide an in-depth look at how to choose your direction and build your website. It also takes a look at how to activate plugins and optimize your website for Google.
Content, Keywords, and Conversions: Here you’ll learn how to create engaging content for your audience and how to add your affiliate links to your product reviews.
Giving Your Site Social Value: You’ll learn how to make your site more social with plugins and how to optimize your social media profiles. This level also covers how to create the kind of content that gets shared.
Get visual, Get aesthetic. Get a Brand Through Media: It takes just 50 milliseconds for online users to form an opinion about a website. These lessons provide an overview of website design and how to create a brand.
Knowing Your Audiences & Catapulting Your Referrals: These lessons dive into how to create content that resonates with your audience and how to drive traffic to your site through video platforms like YouTube.
Bing, Yahoo, & The Power of PPC: PPC, or pay-per-click is an advertising model that lets you place ads on search engines like Google and Bing. These lessons take a look at how to set up your first PPC campaign.
How to Scale Successful PPC Campaigns: The last lesson is all about scale. You’ll learn how to refine and optimize your PPC campaigns to generate even more conversions.
There are several issues that I have with the Affiliate Bootcamp training though.
There’s quite a bit of overlap with the materials here and in the Online Entrepreneur Certification training. That means you’ll spend time learning about topics you already know about.
The promotion methods also place a strong emphasis on PPC to drive traffic. PPC is effective, but it has a steep learning curve and it can be costly if you don’t know what you’re doing.
Finally, the training materials in Affiliate Bootcamp are centered around promoting products like Wealthy Affiliate. You can certainly make money in this niche, but you’re facing a steep uphill battle.
If you’re just getting started with affiliate marketing, I recommend starting first with the Online Entrepreneur Certification training.
Training HQ is another section in Wealthy Affiliate that allows you to learn more about specific topics, such as WordPress, SEO, and more.
Also included in this section are webinar replays, which you can view at your own pace. Overall, Training HQ is a great resource to drill down into more specific areas of affiliate marketing (e.g., how to track conversions).
Classrooms is another learning resource (part of Training HQ), which breaks down topics like SEO, WordPress, keyword research, and more into their own “class.”
That’s not all. If anything is unclear about a particular topic, you can leave a question and get answers from other users shortly. This is a great way to get help with something you’ve been racking your brains over and connect with other members.
Live Events
Finally, Wealthy Affiliate regularly offers weekly webinars to its members. These are typically about an hour long and cover a range of topics from setting up Google Analytics to running campaigns on Pinterest and more.
Even if you miss a webinar, you can still view past events in Training HQ. These ongoing webinars really add to the overall value that you get as a Wealthy Affiliate member.
Let’s take a look at some of the other features that you get with a premium membership.
Wealthy Affiliate Websites
Don’t have any experience building websites?
You’re in luck.
You can use the SiteRubix platform within Wealthy Affiliate to build your first site. It’s easy to use and it includes integrated tools for website analysis and security.
The website builder is a handy feature if you’ve never created a site before. When you first set up your site, you can choose an existing domain, register a new one, or use a free one.
Hosting your site with Wealthy Affiliate offers a number of advantages.
Backups are done every 24 hours, so you can recover to a previous version if needed. You also get a free SSL certificate, which provides a safer browsing experience for your visitors.
Note that you’ll need to upgrade to premium to enable comments on your content, get feedback on your website, and receive technical support.
Alternatively, you can also purchase a domain name from a different registrar and get it set up on a hosting platform. Then if you ever decide to cancel your membership, you won’t have to worry about migrating your site.
Wealthy Affiliate offers the following suite of marketing tools to help you take your efforts to the next level:
Site Rank: Use this tool to see where your site ranks across major search engines like Google for your target keywords.
My Keyword Lists: This feature lets you create and manage your keyword list — useful once you start creating content for your affiliate site.
Alphabet Soup: Need some ideas on niches? With Alphabet Soup, you can uncover tons of niches that you can target.
Brainstorm HQ: One lucrative way to make money with affiliate marketing is to target topics that are trending. Brainstorm HQ can help you identify opportunities.
Affiliate Programs: Here you can see relevant details about affiliate programs you can promote, such as the commission they pay and where you can apply.
Niche Keyword Lists: If you don’t want to bother with keyword research, you can choose a keyword list around a niche you’re interested in and save yourself tons of time.
You also get access to a keyword research tool called Jaaxy. Simply input a keyword and the tool will generate a list of ideas.
You’ll also see other metrics like QSR (Quoted Search Results) and KQI (Keyword Quality Indicator), which tell you how competitive ranking for a keyword is.
Normally, purchasing all these tools on your own would easily cost you well over a hundred dollars a month if not more. But they’re all neatly packaged in Wealthy Affiliate for premium members.
Wealthy Affiliate Alternatives
Wealthy Affiliates is an excellent program if you’re still new to affiliate marketing. It offers tons of training materials and resources to help you build your first site.
But they do focus a little too much on SEO, so it would’ve been nice to see more training on a wider range of traffic sources.
There are some modules on social and paid traffic, but I didn’t see any mention on networking, content marketing, email, forum marketing, blogs and so.
Here are some Wealthy Affiliate alternatives to consider:
Project 24: Project 24 offers a step-by-step program that teaches beginners how to get started with affiliate marketing. It costs $449 for the first year and $199 each year after that.
Authority Site System: Authority Site System is a program that teaches you how to build an authority site. You get access to over 120 video lessons and there is also an active member community. The program costs $997.
There’s no shortage of affiliate training programs, but these are two of the more popular alternatives.
Final Verdict of Wealthy Affiliate
If you’re a newcomer and wondering “how do I get started” with niche and/or affiliate marketing WA is certainly a good place to start.
The training modules, video courses, and tools you get access to make it much simpler to get your own online business up and running based on your passion than if you go it alone and try and figure it all out for yourself.
With the community aspect and help available from mentors and other members, it’ll make you more likely to stick with the training and succeed as you’re working towards a goal together instead of solo as you would usually be.
It’s not perfect and I doubt you’ll become a millionaire after following the training.
But it will definitely get you started, on the right track, teach you the skills you need to be successful, and give you a better chance of success than if you do everything yourself.
It’s easy to dream about being the laptop millionaire with a fancy car, nice house, no debts, and regular luxury travel but until you learn the basic skills you’ll never get there so start mastering them now.
WA teaches you the basic but very essential skills that put you on the right path to being a successful niche marketer and affiliate.
Get these under your belt first (and you can get them very quickly and cheaply thanks to WA) and those dreams might just come true further down the line as you build on the foundations WA gives you.
It’s not a get-rich-quick scheme but it will give you the basic skills every niche marketer needs to be successful.
Get started on the road to your dream life for $0 below…
Do I Recommend It?
Yes, if you’re a new marketer who’s not sure how to get started or what exactly they should be doing then Wealthy Affiliate is a great place to start.
You’ll learn a lot of the basic but essential skills and knowledge from going through the training modules that you can use to create your own profitable niche sites around your passions.
Even the first 10 free modules will teach you a lot but it’s when you upgrade to premium you’ll really see the benefit.
There’s no other course out there that I know of which offers everything Wealthy Affiliate does and trying to compile out the information and skills contained within this course from different sources would slow down your learning and progress by months.
Plus it would cost you more money to go solo as you’d need to purchase keyword research tools and other software which come free with WA.
In WA everything is included and you can quickly fast track your way to success with niche marketing instead of taking the slow, lonely, and painful route.
If you’re ready to fast track your way to niche marketing success then you need to take action now so simply click below instantly…
I hope you’ve enjoyed my Wealthy Affiliate review and concluded that it is indeed a legit way to make money through niche marketing and promoting affiliate products.
Have any thoughts about this Wealthy review? Be sure to leave a comment below.
Building a price comparison site is a popular method of monetizing a website with affiliate marketing. And they can be incredibly lucrative when done right.
You may already be familiar with price comparison websites like Priceline or PriceGrabber, and competing with those sites is pointless. Their domain authority, backlinks and existing traffic are too dominant for most affiliate marketers to compete with.
But these sites are in highly competitive niches.
There aren’t that many price comparison websites in smaller niches, which means there’s an opportunity for you to move into untapped markets and build a profitable income stream.
But how exactly does a price comparison website work? How can you build one and monetize it with affiliate marketing and sales?
In this article, we’ll provide an in-depth look at price comparison websites and look at some examples you can draw inspiration from. We’ll also look at the exact steps to get started and be successful.
What is a Price Comparison Website?
A price comparison website is a site that aggregates pricing information for products, allowing shoppers to easily compare prices in one place.
Price comparison websites also allow online shoppers to compare and filter products based on features, reviews, pricing, and other criteria.
It’s not surprising that these types of websites are popular given that 80% of consumers do online price comparisons.
One important distinction is that price comparison websites don’t actually sell anything. They only collect data and display prices with (affiliate) links to those merchants.
Pros and Cons of Price Comparison Websites
Whether you decide to start a price comparison website is up to you, but it’s important to consider the pros and cons first.
Don’t need to spend as much time on content creation
Extremely lucrative business model when done right
Plenty of untapped markets available (e.g., shoes, beer, etc.)
Niches like travel and finance are dominated by huge brand names, so competing with them requires sizable resources
Requires more steps than a typical affiliate blog — You’ll need to sign up to different retailers and ensure prices display in real-time
Not as easy to rank in Google unless you provide additional value, such as in-depth reviews, consumer guides, etc.
How Price Comparison Websites Deliver Value
It’s not hard to see the appeal of price comparison websites. Who wouldn’t want to get the best possible deal on a purchase?
63% of shoppers perform a quick search on Google to see if they can find a product for a better price. You can tap into this motivating factor by creating your own price comparison website.
But there’s an important caveat here — You need to offer value. Examples can include offering in-depth reviews, downloadable templates, actionable guides, and more on your site.
Listing product prices just won’t cut it and creating a comparison-shopping website like that is unlikely to attract much organic traffic.
Examples of Price Comparison Websites
Price comparison websites are extremely lucrative. But what if you’ve never created one before?
Here are some examples you can draw inspiration from when building your own comparison shopping engine.
Let’s look at a price comparison site with products:
Shopzilla
Shopzilla compares prices from different online retailers for electronics, home appliances, clothing, jewelry, and more.
The product comparison site allows visitors to search for a product and see how much different retailers are offering it. Here’s an example of a price comparison for a Nikon mirrorless camera:
Visitors can click a link to that retailer and complete their purchase. Shopzilla earns a commission for the referral and the shopper saves some money in the process.
Price comparison sites aren’t limited to physical products.
Consumers also use such sites to compare prices for financial services:
NerdWallet
NerdWallet is a personal finance site that offers a price comparison tool for a range of financial products like credit cards, personal loans, and more.
Here’s a table that helps visitors compare rates from different car insurance companies:
In contrast, Shopzilla only provides pricing information for comparison shopping. It would’ve been helpful if they provided guides on mirrorless cameras and how they compare to other cameras like DSLRs.
Let’s look at one more example in a different niche:
Wine-Searcher
Wine-Searcher allows shoppers to compare product prices and check the availability of wines, beers, and spirits to stores near them.
Wine lovers can use this resource to learn more about the regions where their favorite wines are produced.
Let’s look at how pricing strategies work for these types of sites.
How Pricing Strategies Work on Price Comparison Websites
Pricing strategies are about finding the right balance — Set prices too high and you risk losing customers but set them too low and you’ll go out of business.
Setting the right prices is important whether you’re selling a product or offering a service. But things are fairly straight on price comparison apps.
Consumers are savvy enough to know that they can find better deals online. 49.2% of internet users shop on Amazon because they can get the cheapest deal.
As an affiliate, you’ll make a commission whether that visitor purchases from Amazon or another retailer (as long as you add your affiliate links).
The pricing strategy you choose should reflect your target market — If you’re targeting broke students, you’ll want to showcase affordable options and exclusive deals.
But keep in mind that higher-end items mean greater commissions per sale.
Now, let’s look at how you can make a price comparison website and turn it into an income stream.
How to Make a Price Comparison Website
There aren’t that many niche comparison sites from what I’ve seen. That’s good news as you can make your own price comparison site in an untapped niche and bring in a solid income.
Let’s look at how.
1. Pick a Niche
The first step is to find a niche.
Look for a niche that has a low barrier of entry and a decent search volume. It should also have some eCommerce activity and products that people shop online for deals.
Collecting pricing and product information to feed into your site is one of the more difficult aspects of starting a price comparison website.
First, you need to source suppliers you’ll compare on your site and the fields you’ll populate (e.g., models, sizes, colors, etc.). Then you need a way to feed that data to your site.
You have a few options:
Integrated APIs: A retailer provides a data feed directly to your site’s database via an API. You get real-time information, but you’ll likely need to hire a developer to set this up. You can also use a plugin like Datafeedr to import products from different affiliate networks to your site.
Web scraping: This method involves using bots to crawl specific sites to pull relevant information. You can use a tool like Web Automation to scrape price data from retailers you’re promoting.
Manually adding data: This method is the most time-intensive. You’ll likely have to hire a team to help you with the data entry.
3. Build Your Niche Price Comparison Site
Now it’s time to register a domain name and create your website.
Avoid registering exact match domains like compare-digital-cameras.com as they appear spammy and limit the kind of products you can promote.
Instead, go for something more memorable and brandable like CameraStack.com.
There are few options to build a price comparison site. One is to use WordPress and a plugin like Content Egg to pull in data from different retailers.
You can also hire a developer, but this option is extremely costly. I recommend starting off with WordPress.
4. Structure Your Site
Site structure is important from both a user and SEO standpoint. An organized site helps users find the right products and improves search engine indexing.
Let’s say you’re building a price comparison site around camping. Here’s an example of how you can structure your site and map keywords to your pages:
You have your main category at the top (“Best Camping Tent”) and relevant sub-categories below (“Best Car Camping Tent”). Then you have individual product reviews where you can add a price comparison table.
A clear structure improves the overall relevance of your site and makes it easy for visitors to find what they’re looking for.
5. Sign Up For Affiliate Programs
You want to get paid for your work, right?
If a visitor you refer makes a purchase, you can earn a commission. Here are a few popular retailers with affiliate programs you can sign up for:
Amazon Associates
eBay Partner Network
Walmart
Target
Best Buy
Alternatively, there are also affiliate networks that many companies use to manage their affiliate programs. Here are a few:
CJ Affiliate
ShareASale
FlexOffers
Avangate
Each network has different requirements, so be sure to carefully read through them before applying.
Let’s look at how you can drive traffic to your price comparison site.
How to Be Successful With a Price Comparison Site
You’ve built your price comparison site and your affiliate links are set up. But don’t just expect traffic to start flooding in.
Providing value is the key to succeeding with price comparison websites. Here’s how you can drive targeted traffic to your site.
1. Create a Blog
A blog allows you to share relevant and engaging content. Each post you create is an indexed page that a visitor might find when researching a product.
Start by identifying topics that your audience is searching for. Type your keyword into Google and look at the “People also ask” section.
Here’s an example for the keyword “mirrorless cameras”:
These are great topics you can write content around. You can also use tools like Google’s Keyword Planner to uncover more keywords.
Optimize each blog post for your target keywords to improve their visibility in Google and include your affiliate links.
Consumers aren’t just comparing prices online — They’re also turning to Google for product research. Help visitors make an informed decision by publishing in-depth reviews.
Here’s an example of a well-written review from The Wirecutter on Quip electric toothbrushes:
There are tons of social media platforms but start with the major ones — Facebook, Twitter, and Instagram. Facebook alone boasts well over 2.7 billion active users.
It’s important to focus on providing value when using these networks. If you simply spam your profiles with affiliate links, you likely won’t get any followers.
Instead, use social media to share your blog posts and other valuable resources you’ve created.
Price comparisons can be incredibly lucrative. Some of the big names are worth hundreds of millions of dollars in their respective industries.
Attempting to compete against them is a fruitless exercise (unless you have sizable resources). The good news is there are hundreds of untapped markets that are perfect for price comparison sites.
But you also need to focus on providing value. Create content that’s relevant to your audience and consider taking it a step further by making tools available on your site.
You need a name, a niche market, a program, a hosted website, a content plan, and more.
Getting the affiliate website up and running scares most people away before they even begin.
But you’re not most people.
In this step-by-step guide, we’ll give you everything you need to get set up with your own affiliate blog website and generate serious passive profit.
Unlike other “affiliate blog guides,” we’ve cut the fluff and will give you everything you need to make a profitable affiliate blog website without 1000 words of “here’s why affiliate marketing is good…”
We’ve done the research and have assembled a tactical, step-by-step process to get your affiliate site published and earn you affiliate commissions in no time.
Before we start building your site, let’s look at some of the defining characteristics of affiliate blog websites and a few examples.
Affiliate Blog Websites: A Brief Overview
Affiliate blog websites generate revenue through an affiliate link you embed in articles on your affiliate site. Most blogs have a centralized focus or topic.
Some of the most popular blogs focus on the writer, a lifestyle or a passion. As you publish new posts, you can integrate affiliate links into the articles and drive traffic to partner websites.
How Do Affiliate Blog Websites Work?
The premise of affiliate blog websites is simple. Affiliate blog websites are all about attracting an engaged audience with high-quality content.
Once you’ve acquired that audience, you can monetize them. As you partner with brands, you’ll receive your own affiliate links that you can embed in your affiliate marketing blog.
Once a reader clicks on the link and purchases, you’ll earn a commission.
Why Do Affiliate Blog Websites Work?
Consumers read blogs and are actively searching for engaging blog content. In fact, consumers spend 3X more time on blogs than they do on email.
Custom Image 2
However, consumer trust in bloggers is actually the competitive advantage for affiliate blog sites compared to other options.
81% of US online consumers say that blogs are trusted sources of information and advice, compared to only 25% for advertising.
How Do Affiliate Blog Websites Provide Value?
The value provided to the affiliate blog owner, brand and the reader are closely linked. Affiliate blogs deliver community and product recommendations to subscribers who trust the writer.
For brands, the blogs can act as an extension of their channel activation strategy.
It may be cheaper for the brand to pay an affiliate commission on sales to the blogger if they are delivering relevant customers to the brand’s site.
That’s why it’s so important to focus on producing engaging content to attract an audience that brands seek.
Custom Image: Pros and Cons of Affiliate Blog Websites
Real-Life Examples of Affiliate Blog Websites
Now that you know how an affiliate blog website works, let’s take a look at a few live sites that are excellent examples of success.
Jay Clouse is an entrepreneur who helps other entrepreneurs and freelancers acquire customers, launch businesses and sell their products. Jay includes affiliate links in his blog posts when he references a SaaS product that he recommends.
When someone clicks on it and signs up for a free trial or purchases a subscription, Jay receives a commission.
Pinch of Yum sells itself as a “food blog with simple, tasty recipes.” The blog focuses mainly on recipes but also has a Shop page with a variety of cooking products listed on Amazon.
The site is an affiliate of Amazon and receives a cut from all purchases that were originally sourced from the links on Pinch of Yum’s blog post and Shop page.
Creating Your Affiliate Blog Website
To start bringing your affiliate blog website to life, we’ve assembled an eight-point checklist to guide you in your process.
In just a matter of time, you can publish your first article and be on your way to earning your first affiliate commission. Let’s dive right in.
1. Use signals and keyword research to pick a blog focus.
Different web signals and keyword research data will point you in the right direction for what consumers are actively looking for on various search engines.
Websites like Trends and Glimpse are great places to start merely to see which topics are gaining popularity from consumers around the world.
Your blog can focus on yourself, a lifestyle, a passion, or an industry. However, in order for it to be effective, it should attract readers that companies are interested in and serve them content that they are actively seeking.
Keyword research identifies topics and keywords that are generating high search volumes.
Custom Image #4
If the competition for a specific keyword is low and it fits the focus of your blog, this would make a useful topic for a future post.
You might even find that the topic you were intending to write about isn’t being searched for often. If this is the case, you should reevaluate the focus of your blog.
To start your keyword research, pick a free or paid SEO tool to use:
Ahrefs – expensive, but thorough for keyword research and optimization
Moz – free keyword research tool with paid component
For our example, we’ll use Google Keyword Planner. If you want to create an affiliate blog about leather boots, you can input that keyword to generate the search traffic for a list of similar ones:
As you can see from the list, there are a handful of related keywords such as wide calf boots, waterproof boots, men’s dress boots, and black leather boots.
In addition, you can analyze the monthly searches and competition to understand how important each topic is for your blog.
Collectively, these indications will make you well-versed to proceed with a topic and focus that is valuable to readers who are searching for it.
2. Choose a name for your blog.
Selecting the name for your blog is an important decision. The wrong name can be confusing, unclear, and not representative of the type of content you’re publishing.
To start, use a blog name generator to source ideas from related keywords. Even if you don’t use any of the names generated, the results may inspire you to think of the name you need.
For example, if you were starting a lifestyle blog about beach life, you could add the keywords “Beach Living” and click generate.
Then, you’d be paired up with hundreds of ideas for your blog’s name.
Once you have the name in mind, ask yourself these questions:
Is the named representative of the type of content you’re going to write about?
Is the name straightforward and not misleading?
Does the name align with keywords that your audience is searching for?
If the answer to those questions is yes, you’re ready to see if the domain is available.
3. Buy the domain and hosting service.
To ensure your domain name is available, you can do an Instant Domain Name Search to see which options you can buy.
Once you have the domain in your possession, you can transfer it to the hosting service of your choice.
WordPress and Squarespace are simple, easy-to-use content management systems. WebFlow is also an option to consider if you want more flexibility and have time to learn how to customize the platform.
If you’re just starting out, we’d recommend WordPress as your blogging platform. WordPress is the category leader for blog hosting sites. Over 409 million people currently use WordPress, publishing 70 million new posts on the platform per month.
In addition, WordPress has 50,000+ plugins offered in the WordPress Plugin Store, providing you with greater flexibility to create the site you envision.
The WordPress dashboard makes it super easy for a blogger to build their affiliate marketing website and start publishing their first blog post in no time.
4. Use a content calendar template to map your content.
With your site now live, it’s time to start producing content. But what will you write about?
That’s where your content calendar comes into play. A content calendar is a master plan for your content production schedule. It should contain the blog title, topic, URL, focus keyword, publishing date, and the writer assigned.
As you plan your content, always check back to the keyword research you’ve previously done to guide you in topic ideation.
5. Hire contract writers and designers.
While it might be important to work independently at the start, you’ll eventually need a fleet of writers and designers at an arm’s length.
Adding contract writers and designers to your team will be needed in order to scale.
The easiest way to find writers and designers to help is to add a posting to an online services marketplace such as Fiverr or Upwork. Most engagements are on a per-project or per hour basis depending on what you’re seeking.
If you want to hire a freelance writer or designer that works on a part-time basis, consider posting a job on a popular job board like Indeed or AngelList.
5. Optimize your content for search engines and subscriber acquisition.
Once you have your content drafted, it’s time to optimize it.
With the right optimization, you can increase the article’s ranking and improve its chances of being found.
We could write an entire article about blog optimization, but for now, we’ll concentrate on the high-level optimization techniques you need to do for every post. These include:
Adding headings (H1s, H2s, H3s) throughout the article
Including 2-3 internal and external links to relevant, high-quality sites
Ensuring related keywords are included in the post
Adding titles and alt text to images
When consumers go on a search engine or social media, they should be able to find your affiliate site if it is optimized correctly. However, Google and other search engines will need time to properly crawl and rank your site on search engine result pages.
A skilled blogger is obsessed with their SEO; it is what will make their niche site and blog discoverable.
You should also include an email capture form embedded into each blog. As users are reading, they may like the content and wish to subscribe.
Custom Image 7
As you acquire their email address, you can remarket your content to them and use your audience as leverage when you are partnering with brands.
6. Promote your content on relevant channels.
Before you set up affiliate partnerships, you’ll need to prove you have readers.
The easiest way to start getting readers while you wait for your SEO efforts to kick in is to promote your content wherever your target audience hangs out.
This may include LinkedIn Groups, Facebook Groups, Reddit threads and more.
Custom Image 6
If you can get targeted with your promotion efforts, you will have a higher chance of reaching relevant audiences that are interested in your content.
7. Set up affiliate partnerships and integrate links into your posts.
Start thinking about companies that would want to market to your readers.
Many of these brands likely have an affiliate program page on their website that you can review and apply to become a partner. They’ll take a look at your site and readership to decide whether or not you’d make a good affiliate.
Most affiliate programs are listed in a site’s footer:
Once you get accepted, you’ll receive an affiliate link for that specific partner. This is the link that you can add in your blog posts when you reference that company or its products.
To ensure you are receiving the commissions you deserve, you can use an affiliate platform like Rewardful and Tapfiliate to manage your affiliate relationships and earnings.
At first, you may think it’s easy to manage each affiliate by yourself.
However, as you establish more partnerships over time, it can be tough to keep track of everything.
8. Add an affiliate disclaimer to your site.
Consumers like to know when they’re reading a paid promotion or advertisement. In addition, the FTC advises bloggers to make these relationships transparent for their readers.
Your site will only be a success if you’re ethical. You don’t want to lose the trust your subscribers have in your content and your writing.
Adding an affiliate disclaimer lets your consumers know that you may earn a commission from your recommendations.
An affiliate link disclosure makes your entire operation more transparent and adheres to FTC guidelines.
Getting Started
Affiliate blog websites are impactful ways to grow a following, make a name for yourself, and earn affiliate revenue through product recommendations to your audience.
Blog reading has become a daily habit for millions of people around the world.
If you can find a way to stand out and grow your subscriber base, you can form a lucrative affiliate business.
By following these instructions, you will be one step closer to launching and profiting from an engaging blog that consumers love and can’t wait to read.
Luckily, with a little know-how from the experts at NicheHacks, you’ll find it simpler than you think to create a high-converting coupon website in a flash.
Keep reading for insights into how coupon sites work, inspiration from top coupon code sites, and six mind-blowingly easy steps to creating a coupon site that makes a bank.
How does a coupon site work?
For couponers, promo code websites are straightforward. Your search for a coupon for your product on Google, you choose the best coupon from the coupon website, and you use it for your purchase.
On the back-end, the whole process of couponing is underpinned by the affiliate marketing business model.
You’ll find the online coupon codes for your coupon sites on affiliate platforms like Pepperjam, Impact Radius, or Awin.
Affiliates add these discount coupon codes to coupon websites and receive a commission on sales every time a customer uses the coupon code.
Your affiliate platform will manage payments and deliver profits to your account.
Promo code websites are super effective at generating high conversions. 30% of all sales come from voucher codes as opposed to other digital marketing methods.
This is because visitors are drawn to discount code sites to save them money on goods. As 45% of buyers will go online shopping this year, you have a broad market to target.
For brands, shopping deals and coupon marketing is an incredible way to boost sales.
Take clothing brand, Ivory Ella, for example.
The brand experienced 56% year-on-year growth thanks to affiliate coupon programs.
Pros and cons of creating a coupon website
Coupon websites aren’t very content-heavy so they’re ideal for those not passionate about writing.
Promo code sites generate high volumes of inbound leads as people often search for discounts.
Outlay and overheads are inexpensive as there’s no need for inventory management or huge sales teams
There’s an endless list of product coupons to choose from so you can target a niche you’re passionate about.
You’ll need to front-load marketing, which can be expensive and time-consuming at the beginning
It’s tough to compete against big coupon sites
You need lots of conversions as commission percentages are quite low on sales.
Your income stream can fluctuate a lot as coupon offers change, so you’ll need to boost your coupon website with other affiliate income hacks.
Get inspired: 3 examples of high-performing coupon sites
Coupon site example #1: RetailMeNot
See how RetailMeNot makes it easy to find coupons in relevant categories:
(Source: RetailMeNot)
By categorizing coupons, RetailMeNot enhances the user experience and optimizes the coupon site for SEO (search engine optimization) — so it ranks higher in Google.
Notice the top trending daily deals and seasonal promotions. Easy navigation like this boosts the shopper experience.
That’s how RetailMeNot gets 13+ million organic monthly visitors.
Coupon site example #2: Coupons.com
Notice how Coupons.com offers online coupons and printable coupons.
(Source: Coupons.com)
While coupon sites are a top place to offer online discount codes, don’t forget printable coupons. 50% of shoppers take physical coupons with them when they go shopping in-store — especially grocery coupon print-outs.
Coupon site example #3: The Honest Customer
The Honest Customer serves a niche audience with its coupons:
(Source: The Honest Customer)
The Honest Customer is a coupon blog site that uses detailed descriptions to help boost SEO and offers discount codes linked with URLs directly to the shops.
This streamlines the sales funnel as couponers are directed right to the item they wish to buy and the digital coupon is automatically applied.
Launch a Successful Coupon Site in 6 Easy Steps
Follow this handy guide to learn how to create a coupon site from scratch that converts like wild.
Step #1: Make sure there’s a market (Beginner Level)
Picking a coupon niche that you’re passionate about is likely to keep you engaged. However, that doesn’t mean it will be a profitable or even viable market.
You need to ensure that there are enough niche coupon codes for your target market. Can your coupon website offer enough discount coupon codes to drive high traffic to your site?
To find all the online coupon codes that would fit your niche, you need to perform a keyword search, a SERP (search engine results page) analysis, and a search of your affiliate platform.
To perform a keyword analysis, run your website through an SEO audit tool like Ubersuggest, Google Keyword Planner, of Ahrefs.
(Source: Ubersuggest)
Explore popular related search terms used by your target audience. This will help you figure out what to search for when looking for digital coupons to suit your niche on your affiliate platform.
Next, perform a SERP analysis to delve deeper into the types of products your niche is searching for and the style of language they use.
(Source: Google)
Make a note of the common search terms that arise and search these key phrases on your affiliate platform to see which coupon codes are available for your niche.
(Source: Avangate Network)
For a coupon site to really capture a niche, you’ll need a good list of discount coupon codes available. Try to find at least 20 to 30 online coupon codes to kick off your promotional code site.
Step #2: Create a code strategy (Beginner Level)
Your code strategy is important to give consistency to your branding and for monitoring trends within your products.
When selecting products to promote from your affiliate platform, you’ll be able to enter your own personalized shortcode for your audience.
On the surface, all your codes should follow a certain format. That way you create a coherent brand message even if you use multiple affiliate coupons.
(Source: myvouchercodes.co.uk)
On a deeper level, however, your code strategy should work to give you a clear picture of where your sales are coming from.
For example, imagine you’re trying to sell a state-of-the-art watch.
You may A/B test two different landing pages on your deals website geared toward two different target audiences. Each landing page code displays a custom coupon code, so that you can see whether more sales come through landing page A or B.
Lastly, consider which types of digital coupons work best.
Try free shipping coupons in particular. 85% of customers say that free shipping is an online dealbreaker.
Step #3: Optimize your coupon site for monetization (Intermediate Level)
It’s key that you ensure that your coupon website is designed to convert.
Firstly, make sure that all your website tech is spot on. Shoppers leave web pages that are too slow. Make sure your page loads in under five seconds, otherwise you’ll have an abandonment rate of 90%.
Next, design your coupon website with mobile users in mind, as a third of consumers look for online coupons on their mobile. If it’s hard to access your coupon on smart devices, consumers will look elsewhere.
When considering the page design for your daily deal site, think about optimizing it for monetization.
Let’s break down how Brad’s Deals optimizes its coupon homepage to drive profits.
(Source: Brad’s Deals)
It’s easy to navigate to specific brand coupons in the top menu. You’ll also find the latest digital coupons and daily deals here.
On the homepage, top coupon deals are highlighted with a high-quality image and bold explanatory title tag to draw visitor attention.
Notice how the call-to-action (CTA) is shaped like a button — a tactic that can double conversions.
Brad’s Deals also provides social buttons to encourage sharing on social media. This helps to market the coupon on multiple platforms.
Lastly, check out the PPC (pay-per-click) ad on the right-hand side. Brad’s Deals monetizes every inch of the page by using sidebar ads to generate extra income.
Step #4: Build a solid SEO strategy (Intermediate Level)
While online coupons are in high demand, you need a strong SEO strategy to make sure your audience sees your coupons.
Your SEO strategy works to push you up search engine results pages (SERPs) so that you have a higher search engine ranking.
50% of all Google’s traffic goes to the top search result. If you’re not there, half your target audience are clicking on a competitor.
Google ranks on 200 factors. These factors make sure that the top search result is relevant, current, user-friendly, high-quality, and so on.
To get your coupons website to the top spot for your niche:
#1 – Perform an SEO audit of your coupon website
Use a tool like Ubersuggest to perform an SEO audit.
This will show you your top-performing keywords. You can see which keywords reach the top position on Google and which don’t.
From here, you can focus on improving the keywords in the 2nd, 3rd, and 4th positions to overtake the competition.
(Source: Ubersuggest)
Your SEO audit will also tell you about your technical SEO, such as the number of backlinks to your site, the number of broken links, and any critical errors.
(Source: Ubersuggest)
Your SEO audit will provide a guide to optimizing your technical SEO.
#2 – Add keywords to visible content
All content on your website should be optimized with keywords.
This means inserting relevant keywords into your coupon descriptions, articles, titles, product descriptions, podcast summaries, image captions, and so on.
#3 – Insert keywords on the back-end
All images, videos, titles, graphics, etc, needed to be tagged to show they’re relevant to Google searches.
To do this, you need to insert keywords into your image and video alt-text, title tags, meta descriptions, etc.
#4 – Optimize technical SEO
Use the SEO audit to guide you toward fixing any technical errors on your site, such as broken links or bad routing.
Perform a page speed test to make sure your website loads fast enough.
Lastly, make sure that everything loads properly both on mobile and on desktop.
Since it’s not common practice to have a blog on a coupon website, you need to find other opportunities to optimize your website for different coupon searches.
An easy way to do this is by creating seasonal or topic-specific buying guides that highlight the month’s top coupon deals.
(Source: savings.com)
Create different landing pages targeted to your various audience segments. Feature buying guides that showcase trending coupons that synchronize with what’s happening in the real world.
That way, you can capture your audience with seasonal deals while boosting SEO for seasonal product searches.
Notice how the CTA button pops up with the online coupon information when you hover over the products in the lookbook. This interactive experience engages the users and encourages them to click through.
Step #6: Capture shopper data for with a pop-up (Advanced Level)
Pop-ups are a powerful tool, with conversion rates of up to 10%. Test different style pop-ups to see which get the best responses.
Use these pop-ups to collect data for future email marketing campaigns and later coupon offers. Emails are a great way to get codes directly to the end-user by firing them straight to their inbox.
Check out how Zulily entices users to subscribe to emails with a pop-up.
(Source: Zulily)
Encouraging users with the incentive of big savings, Zulily makes it easy to sign up with only an email address.
Conclusion
Now you have a better understanding of how the coupon website model works, you can create your coupon website using these simple steps.
It’s mostly down to how to share and market your coupon website. Make sure that you match your target audience to relevant vouchers as personalization drives conversions.
If you have questions about how to create a coupon website, don’t hesitate to reach out. Contact the experts at Niche Hacks.
However, it can be complex to understand how the business model actually makes money. If you have no idea how you’ll turn profits, it’s hard to know where to start.
If this sounds like you, you’ve come to the right place. Luckily, creating unusual product sites is easier than you think.
You’ll learn how unusual product sites work as well as the pros and cons of creating your own.
Note: This article assumes you already have a chosen niche, have registered with the leading affiliate programs, and are ready to get started with creating a website. As a result, we’ll skip over the beginner stuff and get you right to actionable strategies to building the best unusual product site you can.
How does an unusual product site work?
Unusual product sites work through affiliate marketing. Affiliate marketing refers to the practice where a vendor links to a curated selection of goods from different brands. When buyers purchase through the affiliate vendor’s link, the affiliate makes a percentage of the sale from the brand.
In reference to unusual product sites, website owners host links, information, and images of niche products, such as wacky finds, homemade gifts, seasonal items, and gadgets.
To encourage a loyal community on an unusual product site, users can often like, collect, and share products, as well as purchasing through affiliate links.
The business model works by creating an engaged audience within a specific niche to drive traffic with high-quality curated content.
Since 46% of buyers have used a subject expert website, the market for unique product websites is broad.
If you’re looking for a mostly passive income, a unique product site is a great choice for an online business. When you consider that affiliate marketers got over five billion clicks last year, it’s clear there’s room to make money.
If you’re new to starting a unique product website, take marketing expert and full-time blogger Evan Porter’s advice:
“Pick a topic you’re passionate about, or have some expertise in, and focus on bringing real value to people rather than just trying to intercept people on their way to Amazon or other marketplaces”
Worried there’s no money to be made with a unique product site?
Consider that last year Awin affiliates, the mass-majority of them niche, earned over $900 million. That could be you.
Pros and cons of creating an unusual product website
Like all online ventures, starting an unusual product website comes with its advantages and disadvantages.
Reap the benefits of passive income, low overheads, and global travel.
Most of your content is image and video-based, making content creation quicker than text-based sites.
The potential for vitality makes it likely you’ll make good profits.
It’s easy to match your niche audience to niche products.
No need for a hefty sales team.
Social media marketing is inexpensive lead generation.
You don’t need to warehouse inventory or manage delivery.
No or low office overheads.
Endless list of products to choose from with big affiliate platforms
Hard to get traction in the market so you’ll need to front-load outbound marketing. This can be costly at the beginning.
You may have to pay for endorsements/influencers upfront.
There are already several big unusual product sites that dominate the market.
Remember that you only make a percentage of product sales so you need a lot of conversions to ensure solid ROI.
Beware of competition from other affiliates promoting the same products.
Your income can fluctuate wildly, especially at the beginning.
Get inspired! Unusual product site example: Idlecat
Look how niche product site, Idlecat, focuses on all things cat-related:
By curating cat-themed gifts, this unusual product site creates a centralized marketplace for feline fans. Now they don’t need to shop around for their kitty-themed goods.
Notice how the top recommendations are above the belt, to direct customers to top products quickly.
Build a High-Converting Unusual Product Site in 8 Simple Steps
You’d like to diversify your income stream with an unusual product website that appeals to a niche group. However, you don’t know where to begin.
To maximize conversions, you need a niche site that engages your target audiences so you can drive them through your affiliate links.
Follow this straightforward walkthrough on how to create an unusual product site from scratch.
Beginner Level – Step #1: Research unusual products within your niche
When you consider that Google’s top search result gets 50% of all traffic, it’s clear you need to be at the top of Google for your niche audience to find your unusual product site.
Before setting up your unusual product website, you’ll need to understand what trends drive your niche. This will also help you to name your unusual product site and pick your URL.
Do this by performing a keyword audit and a SERP (search engine results page) analysis. This will help you to identify the most popular Google searches performed by your niche audience to see product trends.
How to perform a keyword audit
To find popular niche search terms, use a tool like Google Keyword Tool, Ubersuggest, or Keywordtool.io.
For Ubersuggest:
Head to the tool and enter search terms related to your niche
Look for related search terms that also receive high traffic volumes. These search terms often offer useful ways to structure and categorize your unusual product site.
How to perform a SERP analysis
Head to Google and type in your key search terms for your niche unusual products.
Check out the top results to see the common keywords and trends that are repeated
Note the kinds of products being offered as well as the format in which these unique products are presented.
Beginner Level – Step #2: Choose a domain name
While domain names don’t have the SEO (search engine optimization) impact that they once did, your URL does help to improve credibility with your audience, while signposting your services.
Choose something short, snappy, and easy to remember.
For example, Unique Home Products has the URL uniquehp.com. This leads to a site with rare home products. The URL is relevant to the unusual home product site without using too many letters.
To search for available domain names, head to a web domain provider like GoDaddy, BlueHost, SiteGround, or HostGator.
Simply sign up and Wix will walk you through its simple drag-and-drop builder tool. Alternatively, access a range of ready-made website templates to kick your affiliate site off quickly.
Make sure your website is mobile responsive. According to HubSpot, 93% of consumers have left sites that won’t load properly on their devices.
Intermediate Level – Step #4: Craft a targeted SEO content strategy
To push you high up Google searches, your website content should be full of relevant keywords.
Anchor in keywords with pillar content that relates to the products in your site. Support this content with cluster content that goes into more detail with related keywords.
Known as the topic cluster strategy, over 55% of content marketers use the pillar and cluster content structure because it improves your search rankings.
Remember that 90% of pages get no traffic at all, so focus on a handful of key search terms to really gain traction in your niche.
Intermediate Level – Step #5: Optimize technical SEO on your site
To complement your content SEO effort, you need to optimize your technical SEO.
Google ranks for 200 factors. Technical SEO factors include:
Image and video alt-tags
Title-tags
HTTPS status codes
Metadata
XLM sitemap status
To see how well your technical SEO is faring, perform an SEO audit.
More importantly, use your SEO audit to see the technical SEO issues on your website.
Advanced Level – Step #6: Optimize a website performance
While web performance feeds into your SEO, it’s super important for the user experience of your unusual product site.
70% of consumers say that poor page speed affects their chances of purchasing from a website. This means you’ll lose visitors if your website is hard to use and slow.
Compress every product image and video on each product page so your website loads quickly. HubSpot’s study shows that 93% of shoppers leave websites that take too long to load.
“Many sites are old and slow. If you are just starting out, focus on building an incredibly fast loading website that provides solutions immediately.”
Key performance factors to consider for your unusual product site are:
Compression
Browser caching
Redirect reduction
Improvements to response time
CSS, HTML, and JavaScript minification
Moreover, think mobile-first. Over 50% of web traffic comes from mobile users and 73% of consumers will leave a non-responsive website.
Make sure your site responds to mobile devices.
Advanced Level – Step #7: Collect customer data for future marketing
Content Marketing Institute found out that a third of marketers say email is the best way to nurture leads. Consider adding a newsletter signup to your website to capture customer data.
Once signed up, send personalized email marketing campaigns that recommend products specific to the customer. An easy way to do this is to add checkboxes to your lead capture form asking about customer interests.
Try using different lead capture landing pages to segment your audience based on the products they’re looking at. Perhaps place product-specific pop-ups on product pages to segment the audience by their viewing habits.
See how Cheapism personalizes email marketing by frequency:
The delayed pop-up appears on the webpage after a few minutes. Since delayed pop-ups convert better, it’s wise to code your pop-up to trigger after a few moments or as visitors scroll.
Notice how Cheapism asks subscribers to pick how often they’d like email campaigns. By doing this, Cheapism increases the chances of users opening emails as they won’t feel bombarded.
Advanced Level – Step #8: Analyze your data and learn
Business guru, Eric Reid, stresses the importance of the Build-Test-Learn model.
To be successful in marketing your unusual product site, you need to identify which campaigns work best and which waste resources.
Use Google Analytics to monitor your web traffic. Work out which products are most popular and offer more of these. Nearly 30 billion live websites use Google Analytics because it shows you everything you need to test and learn from your website campaigns.
The same goes for social media. Check out the analytics dashboard to see which products your audience engages with best.
That way, you can tailor curation to suit your customers, increasing conversions.
Conclusion
Now that you have an action plan to build a niche product site, you’ll have no issues launching your online emporium and directing customers to shop online through your affiliate links.
A fantastic way to make passive income, you’ll find that an affiliate website needs little work and attention, once you’ve set up your content systems.
If you need more help on how to create an unusual product site, contact the experts at Niche Hacks.


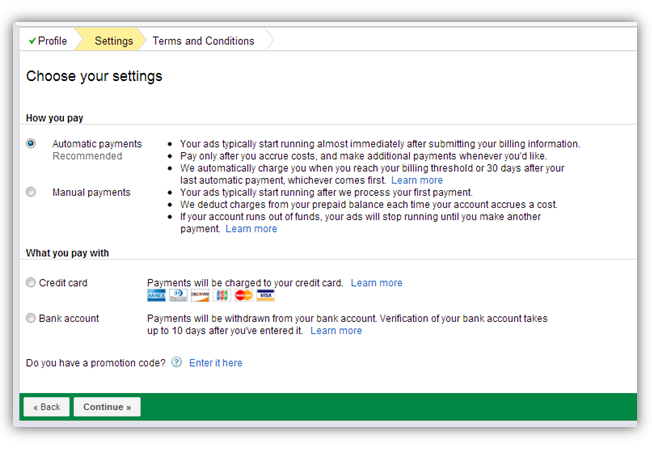


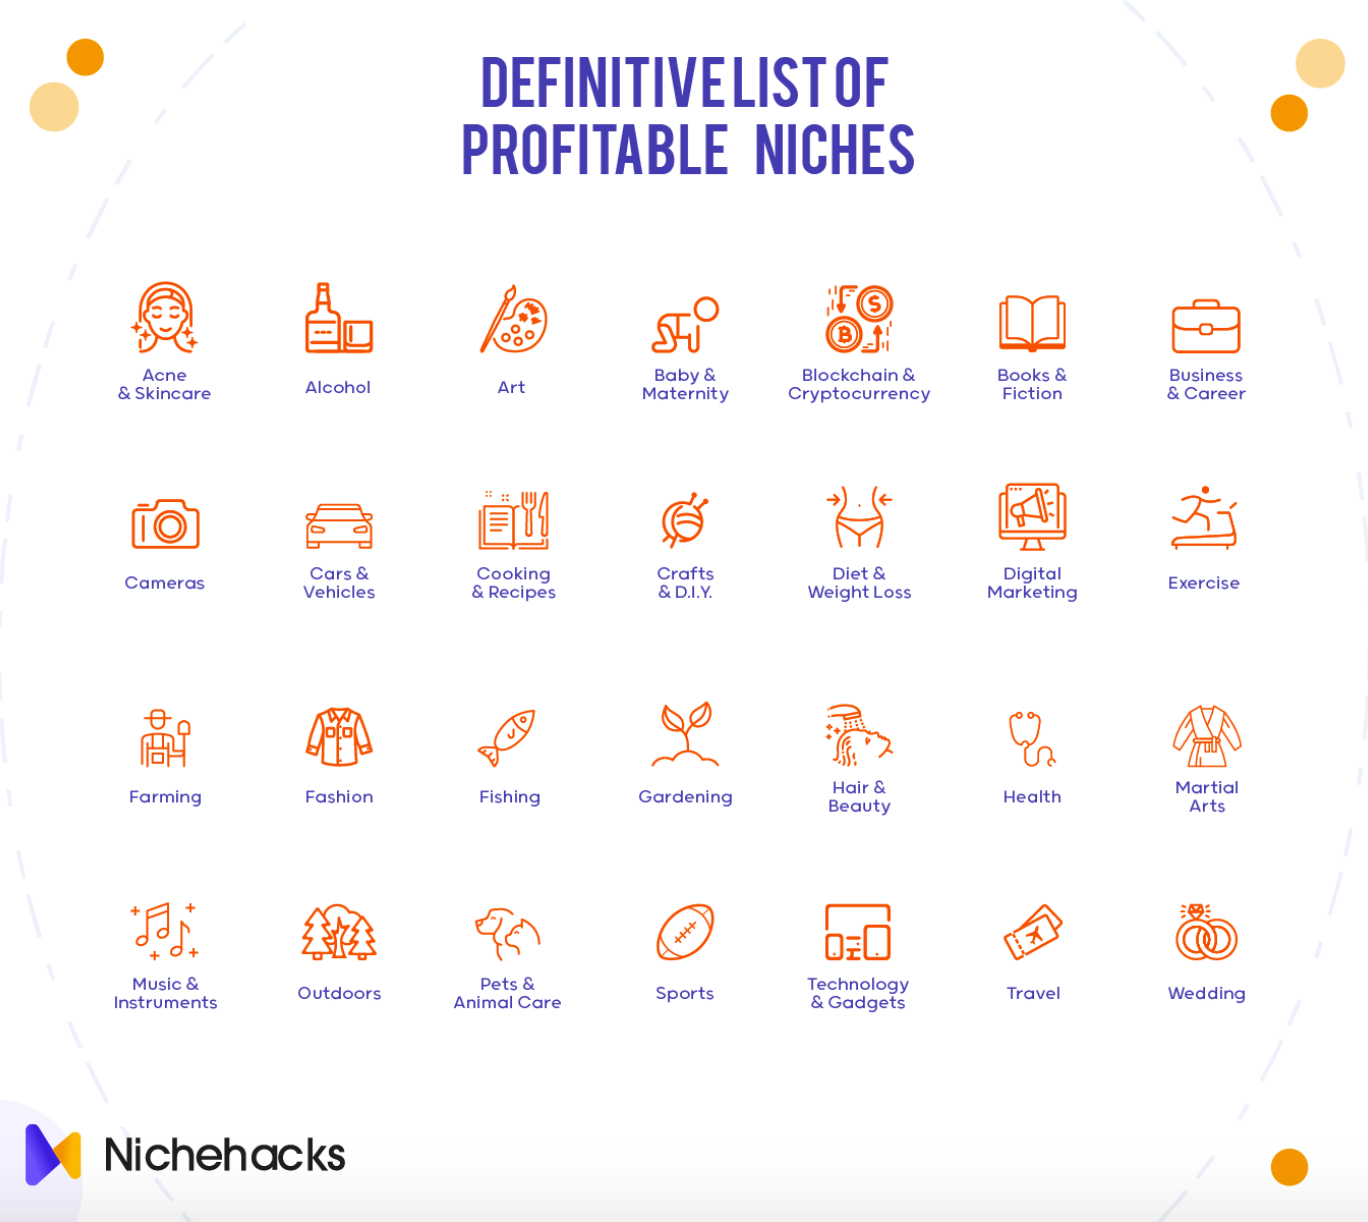

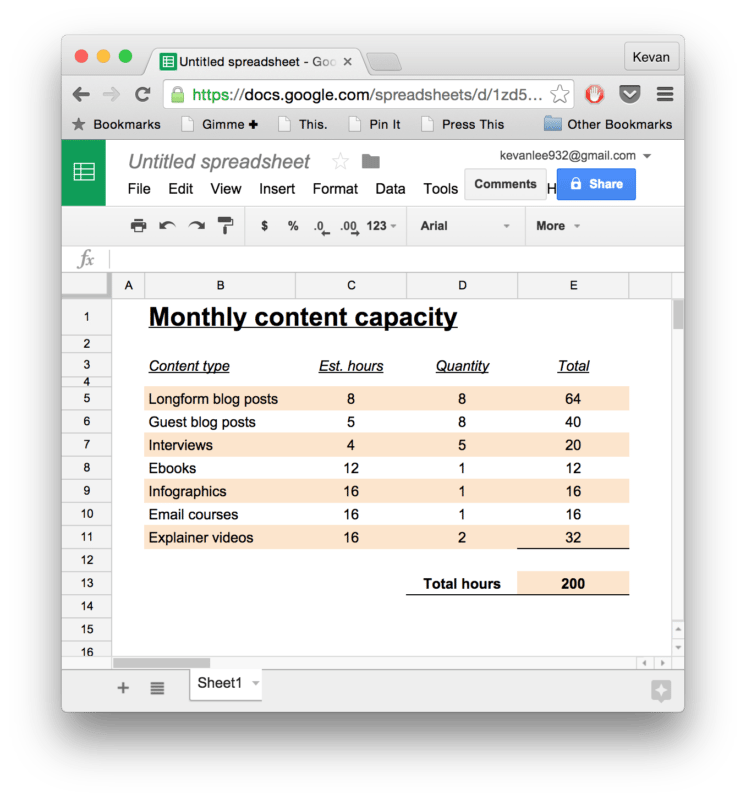


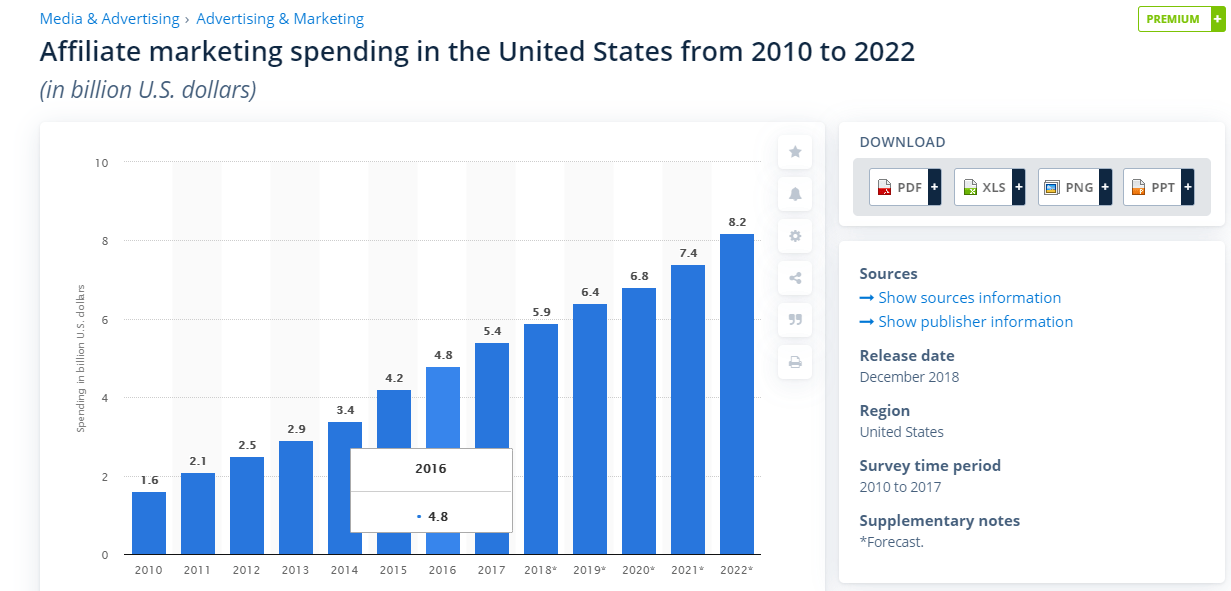


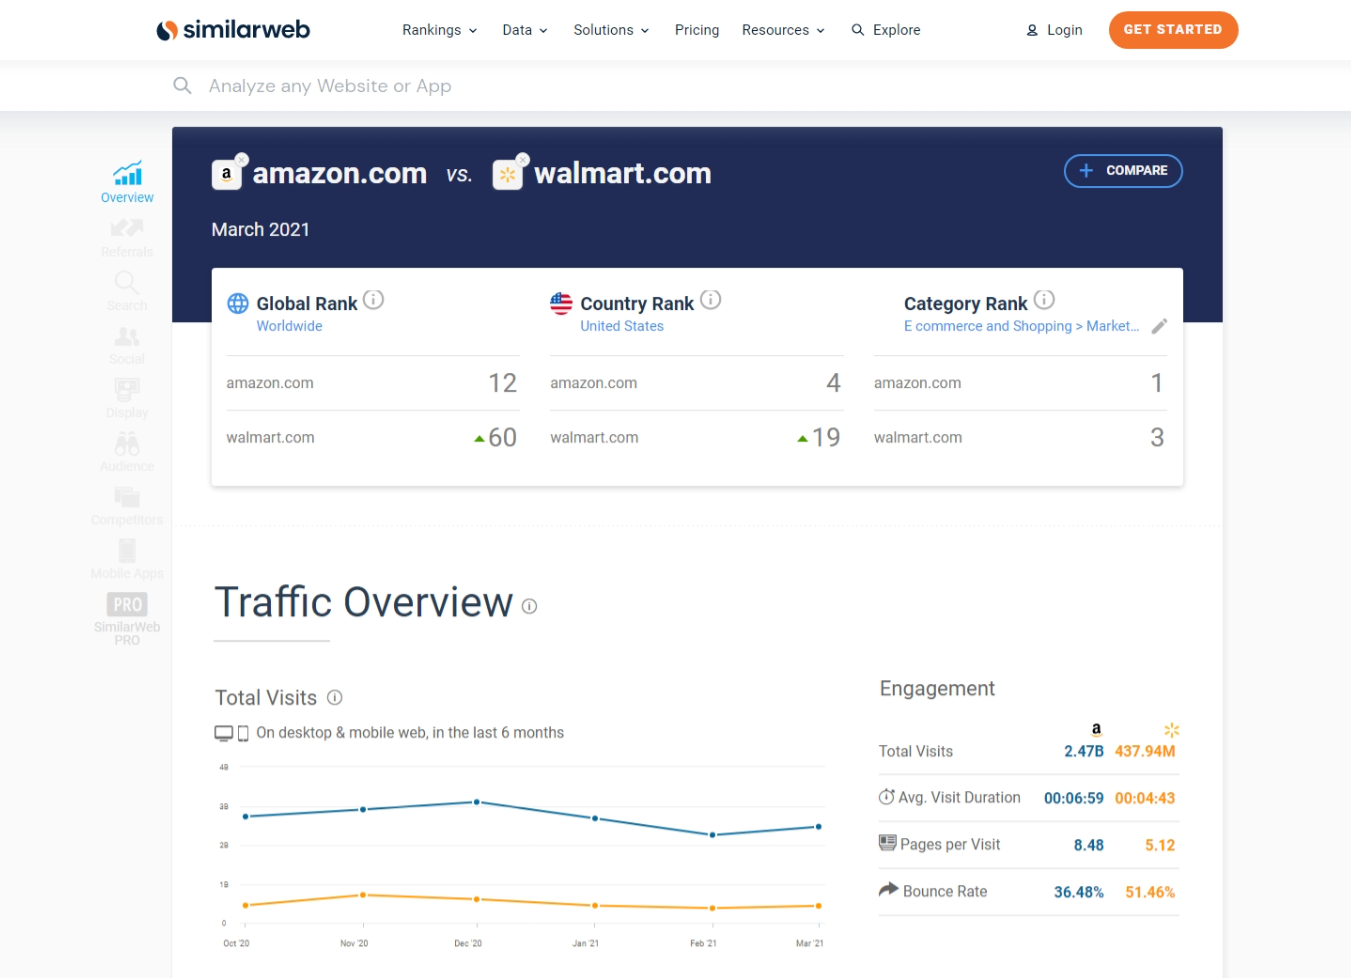


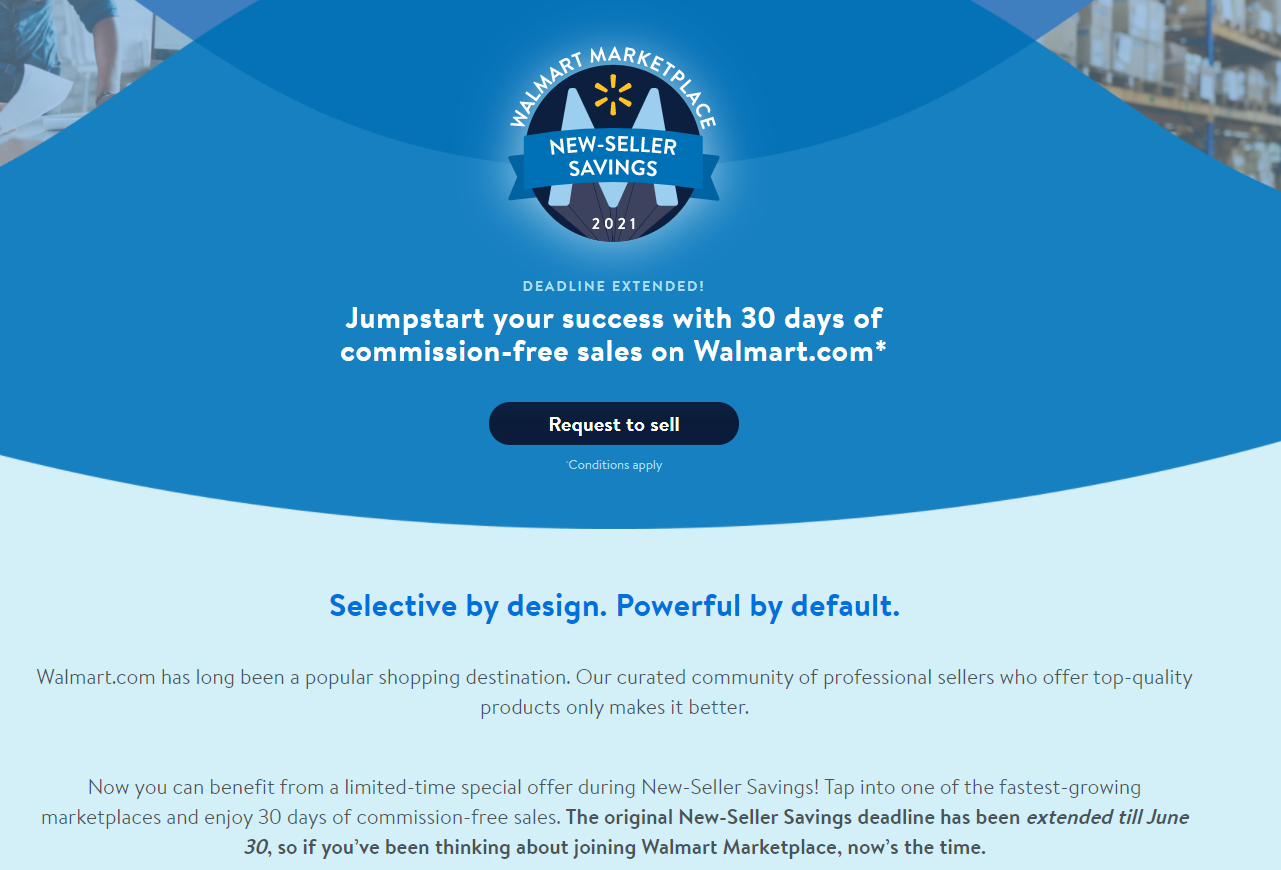


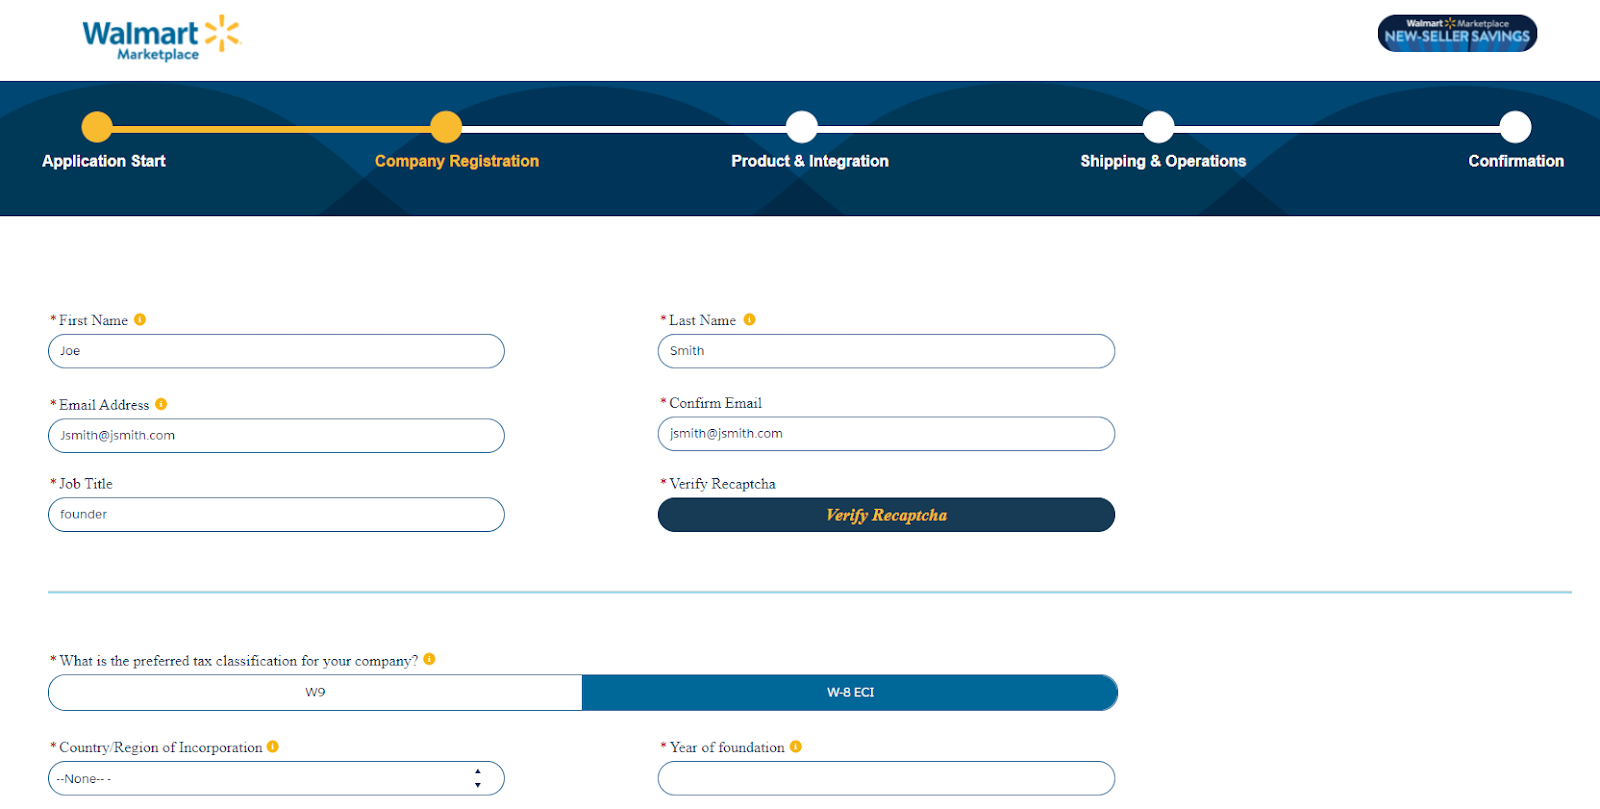


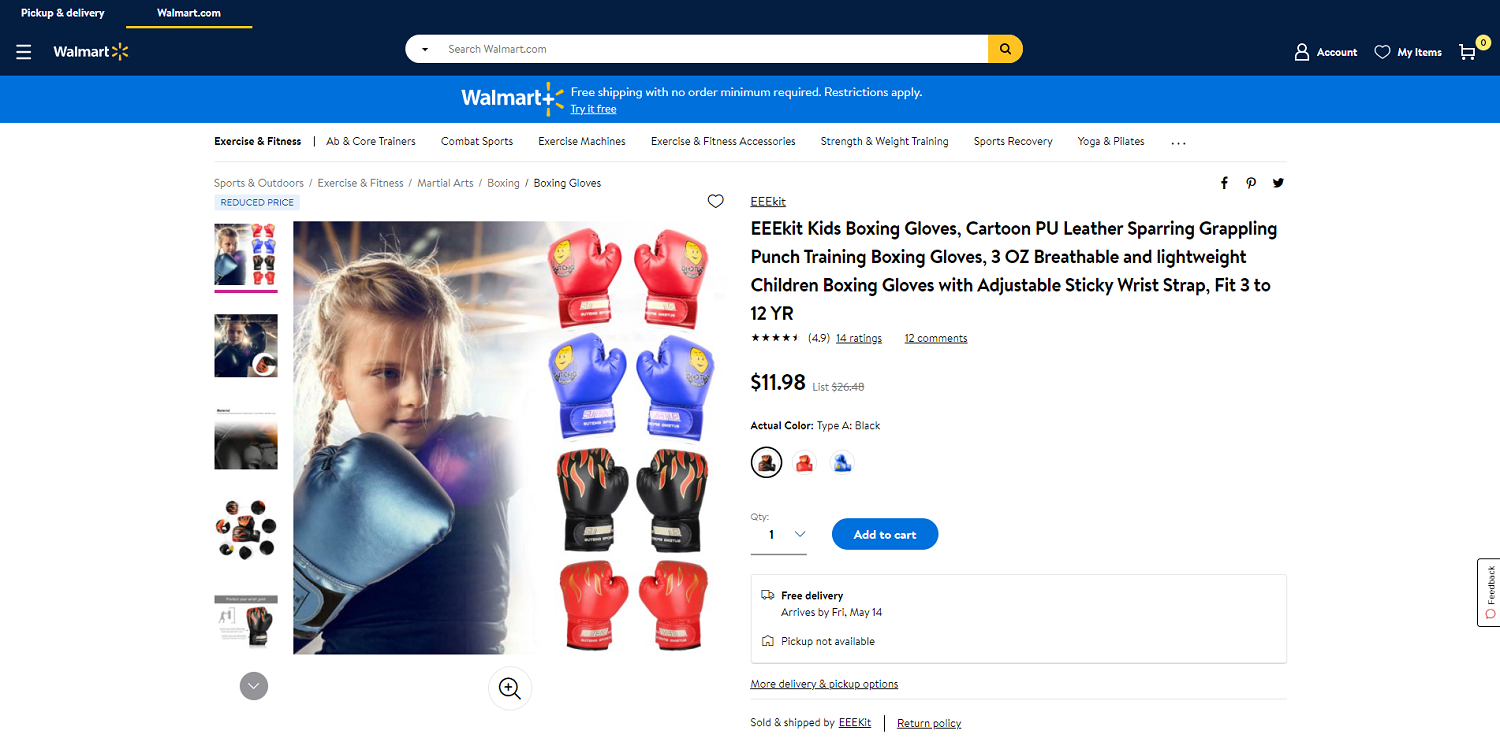


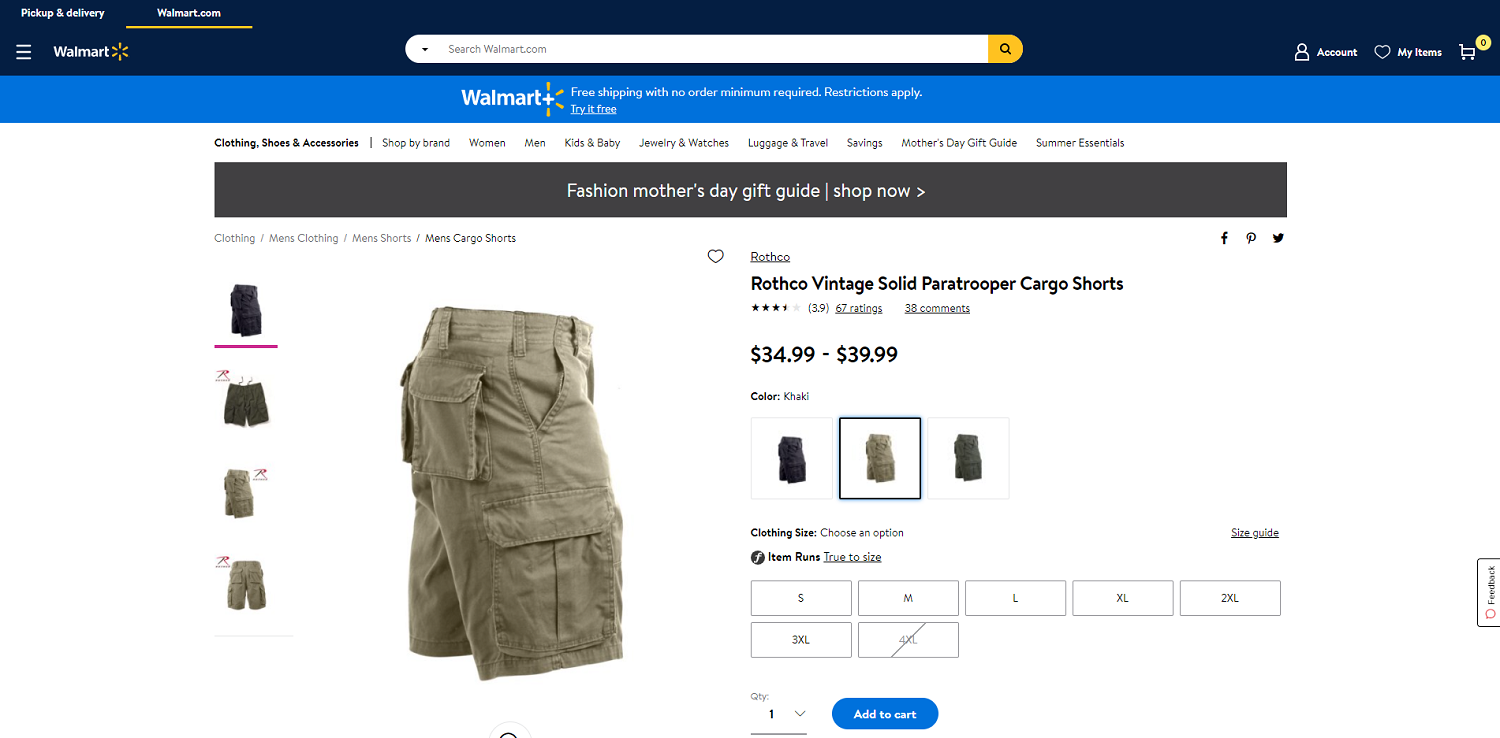


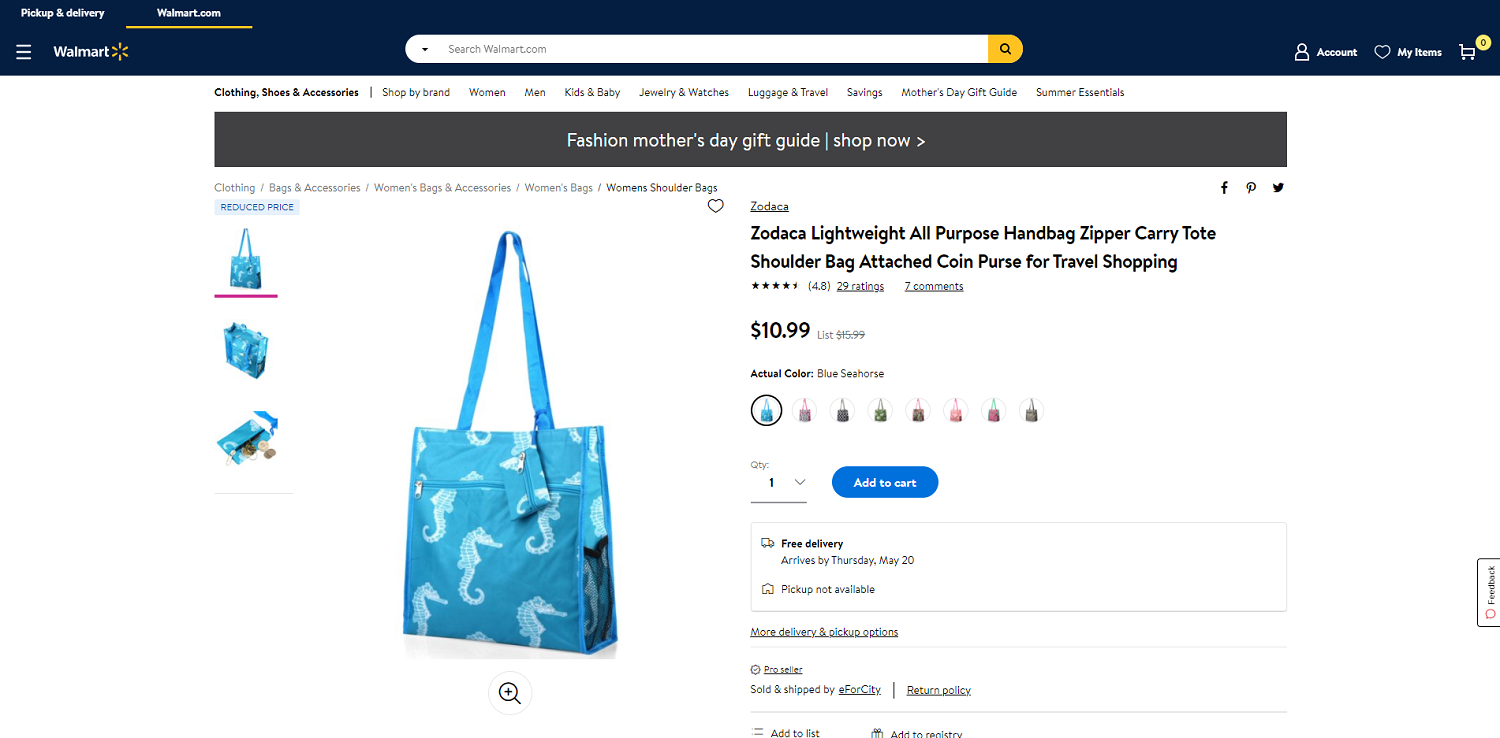
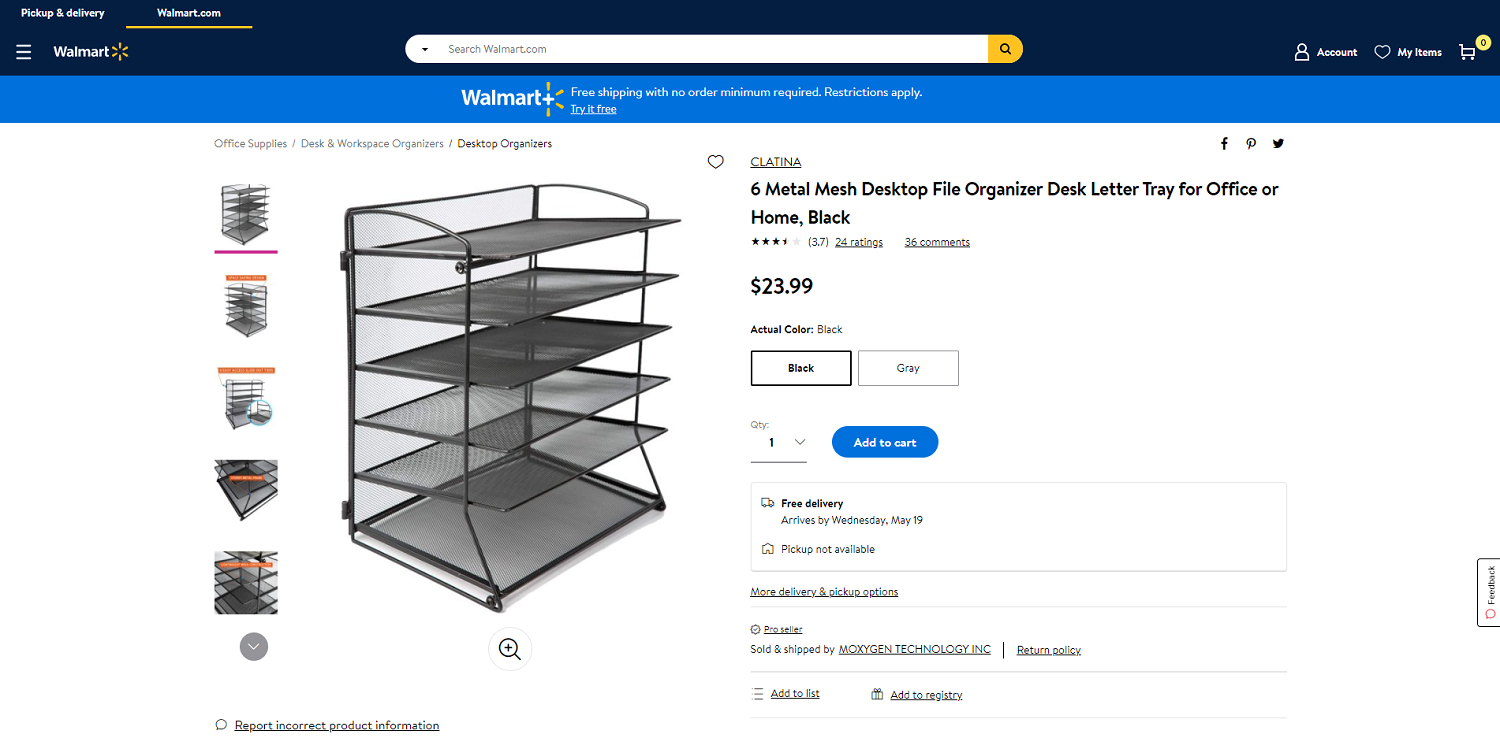


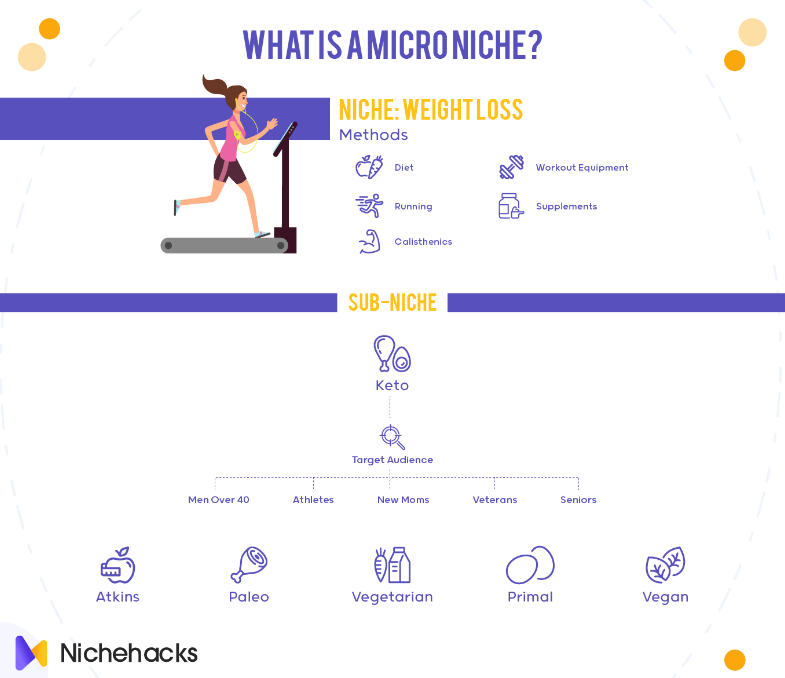